Microsoft Edge, the web browser developed by Microsoft, has become a popular choice for many users. However, some users have reported an issue where Microsoft Edge keeps appearing on their desktop, even when not in use. That’s why many users looking to fix Microsoft Edge keeps appearing on desktop.
This can be an annoying problem, but fortunately, it can usually be fixed with a few simple steps. In this guide, we’ll explore various methods to resolve this issue.
Contents
- 1 Fix Microsoft Edge Keeps Appearing on Desktop: Remove Microsoft Edge From Startup Apps
- 2 Change Your Default Browser
- 3 Edit Microsoft Edge’s Registry Keys
- 4 Remove Any Microsoft Edge References in Task Scheduler
- 5 Turn Off Microsoft Edge Via Group Policy Editor
- 6 Stop Others From Being Able to Create Desktop Shortcuts
- 7 Completely Remove Microsoft Edge From Windows
- 8 Conclusion
Fix Microsoft Edge Keeps Appearing on Desktop: Remove Microsoft Edge From Startup Apps
Microsoft Edge, like many other applications, can be configured to launch automatically when your computer starts. While this feature might be convenient for some, it can lead to slower startup times and may be unnecessary for users who don’t regularly use the browser.
If you find that Microsoft Edge is launching every time you start your computer and want to change this behavior, this guide will walk you through removing Microsoft Edge from your startup apps.
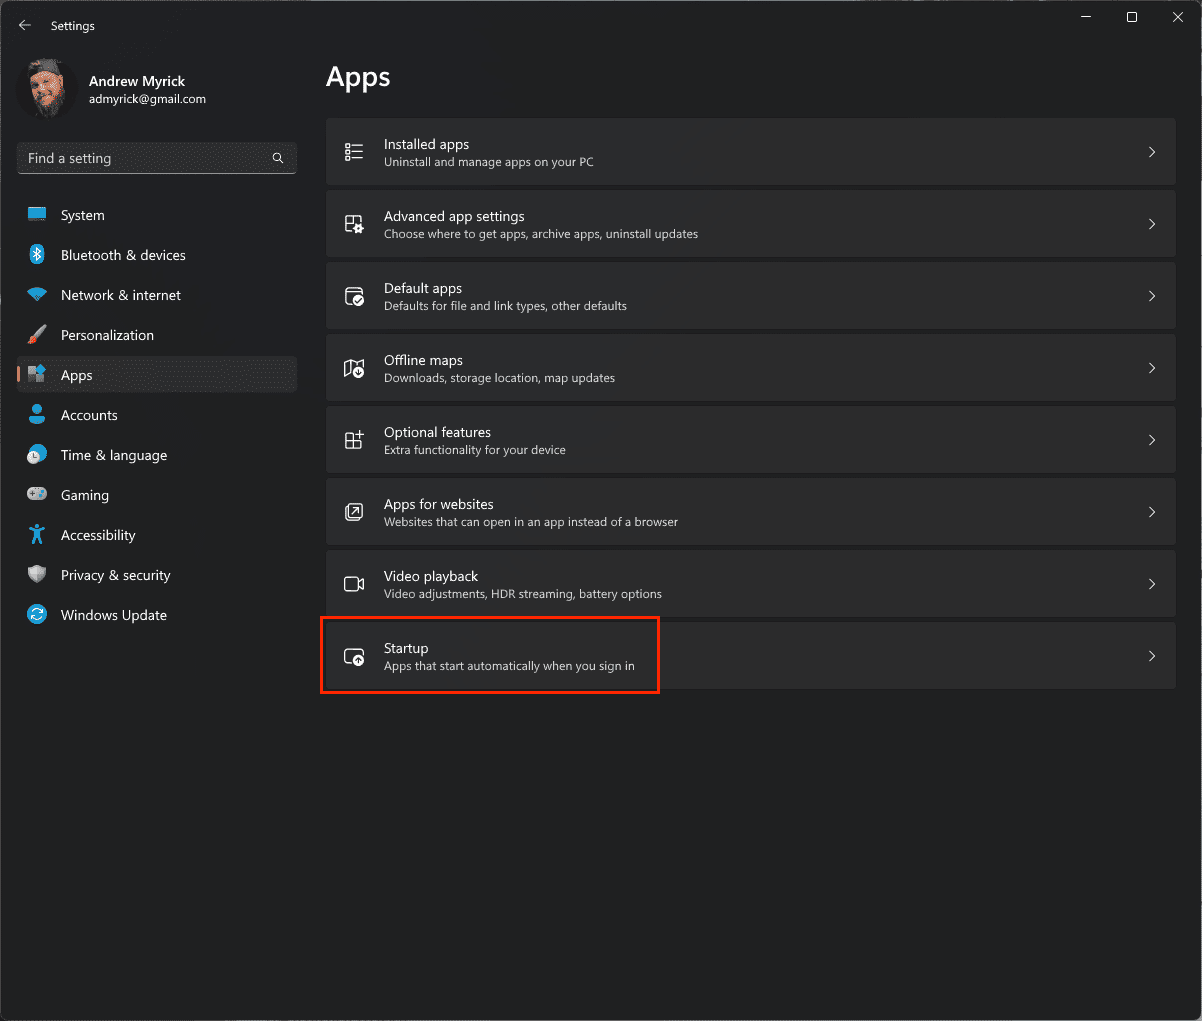
- Open the Settings app on your Windows computer.
- In the sidebar on the left, click Apps.

- On the right side of the window, click Startup.
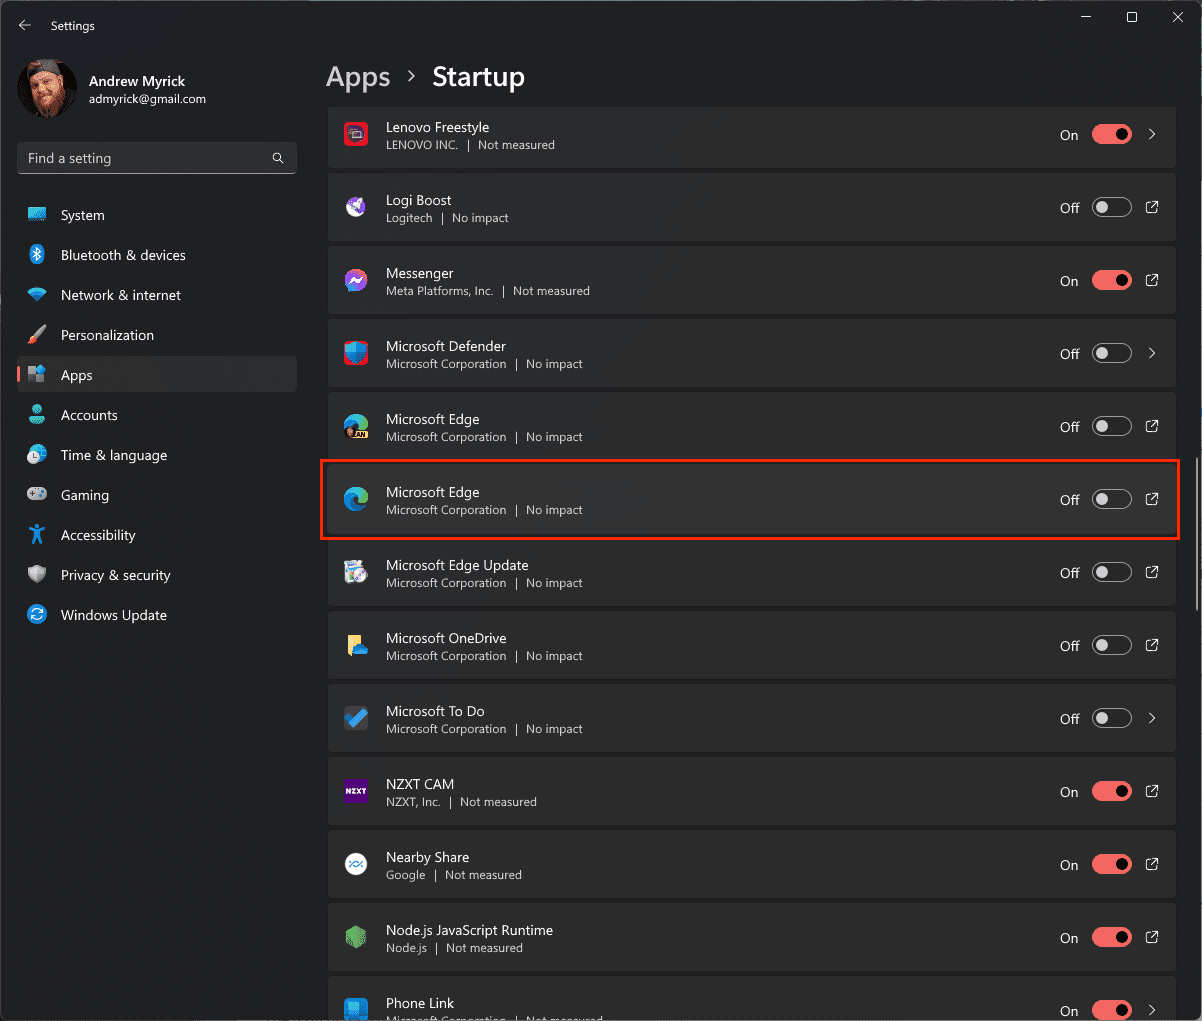
- Scroll through the list and locate Microsoft Edge.
- Click the toggle to the Off position.

This isn’t the only way to remove Microsoft Edge from starting up automatically whenever you turn on your computer. The other option gives you a bit more control, as you can turn off the execution (.exe) file itself instead of just the application name.
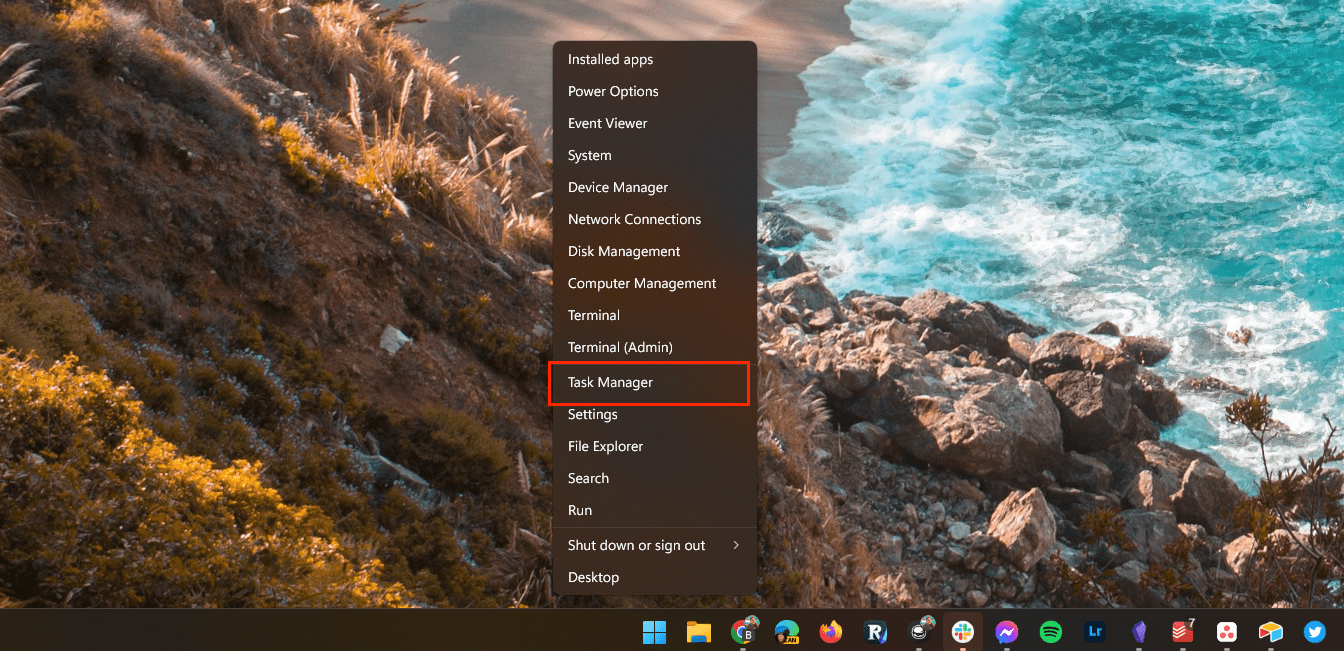
- Right-click the Windows Start Menu button.
- From the pop-up menu that appears, click Task Manager.

- Click Startup apps in the pane on the left.

- Scroll through the list of options and locate Microsoft Edge or msedge.exe.
- Right-click the app.
- From the menu that appears, click Disable.


Removing Microsoft Edge from your startup apps is a straightforward process that can lead to a more personalized and efficient computing experience. By following the steps outlined in this guide, you’ve taken control over what applications run when your computer starts, potentially speeding up boot times and reducing unnecessary background processes.
Remember, the control over your computer’s behavior is in your hands, and understanding how to manage startup apps is a valuable skill that enhances your overall user experience. Feel free to revisit this guide anytime you need to adjust your startup applications.
Fix Microsoft Edge Keeps Appearing on Desktop: Turn Off Microsoft Edge Updates
Another potential culprit for those finding that Microsoft Edge keeps appearing on Desktop is that the app is being regularly updated. This is usually done in the background or when the browser is closed, as it can’t be updated while you’re actively browsing the web. Some have found that disabling Edge Updates will stop the app from appearing on your Windows desktop.
- Right-click the Windows Start Menu button.
- From the pop-up menu that appears, click Task Manager.
- Click Startup apps in the pane on the left.
- Scroll through the list of options and locate MicrosoftEdgeUpdateCore.exe.
- Highlight this option and click the Disable button in the window’s top right corner.
If you want to be safe, we recommend restarting your computer after making these changes. Then, go back through the steps to ensure the same .exe process didn’t automatically reappear.
Change Your Default Browser
The easiest way to prevent Microsoft Edge from appearing on Desktop is to change your default browser to something else. You might think that you already did this before, but there’s a chance that an update to Windows put Edge back as the default when handling certain file formats or links.
- Open the Settings app on your Windows computer.
- In the sidebar on the left, click Apps.
- On the right side of the window, click Default apps.
- Scroll through the list of apps until you find the browser you want to use instead.
- Click the browser entry.
- At the top of the page, click the Set default button.


You should see all options below the Set default file types or link types section change to whatever browser you choose. However, you’re not out of luck if you still have Microsoft Edge as the default for specific file formats and links. Go through the list, select the ones where Edge is the default, and then select the browser you want to use instead.
Edit Microsoft Edge’s Registry Keys
Microsoft Edge’s registry keys are a powerful set of configurations that govern the browser’s behavior at a deep level. For advanced users, editing these registry keys can unlock customization and optimization beyond the standard settings available within the browser’s interface. This guide will walk you through editing Microsoft Edge’s registry keys to stop the app from appearing on your desktop.
- Press Win + R on your keyboard to open the Run dialog box.
- Type regedit and hit Enter to open the Registry Editor.

- In the panel on the left, locate and highlight HKEY_LOCAL_MACHINE > SOFTWARE > Policies > Microsoft.
- Right-click on Microsoft.

- Highlight New.
- Select Key.

- Name it EdgeUpdate.
- Right-click the newly-created EdgeUpdate Key folder.
- Highlight New.
- Select DWORD (32-bit) Value.
- Name it CreateDesktopShortcutDefault.
- On the right side of the window, double-click the DWORD entry.
- Enter 0 in the Value data field.
- Click the OK button to save the changes.

- Right-click again on the EdgeUpdate Key folder.
- Highlight New.
- Select DWORD (32-bit) Value.
- Name it RemoveDesktopShortcutDefault.
- On the right side of the window, double-click the DWORD entry.
- Enter 0 in the Value data field.

- Click the OK button to save the changes.
- Close the Registry Editor application.
- Restart your computer.


Editing Microsoft Edge’s registry keys is a task that requires precision, understanding, and care. While modifying these keys offers a high degree of control over the browser’s functionality, it also comes with risks if not handled properly.
Remove Any Microsoft Edge References in Task Scheduler
Like many modern browsers, Microsoft Edge may have scheduled tasks running in the background to enhance its performance, update features, or collect usage data. These tasks are managed through the Task Scheduler, a component of Windows that allows for the automation of routine tasks.
While these scheduled tasks are generally harmless, some users may prefer to remove any references to Microsoft Edge in the Task Scheduler for various reasons, such as privacy concerns or troubleshooting specific issues.
- Click the Windows Start Menu button.
- Type Task Scheduler and hit Enter.

- In the pane with the chart of different tasks, locate any with Microsoft Edge Update in the name. These should be grouped by default.

- Right-click each entry.
- Select Disable from the menu that appears.
- Repeat the steps for any other Microsoft Edge-related tasks.
- Make sure you see Disabled next to these entries under the Status section.
- Close the Task Scheduler app.
- Restart your computer.


Removing references to Microsoft Edge in the Task Scheduler is a process that offers a deeper level of customization and control over your computer’s operations. Whether you’ve undertaken this task to address a specific problem, enhance privacy, or better understand how your system works, the steps outlined in this guide have provided the means to achieve your goal. It’s important to approach this task cautiously, understanding that changes to scheduled tasks can have broader impacts on your system.
Turn Off Microsoft Edge Via Group Policy Editor
Administrators may wish to turn off or restrict access to Microsoft Edge in certain environments, such as corporate networks or educational institutions. This can be done for various reasons, such as enforcing specific security protocols or managing system resources.
The Group Policy Editor is a powerful tool that allows administrators to implement these changes across multiple computers within a network. This guide will provide detailed instructions on how to turn off Microsoft Edge via the Group Policy Editor, allowing for centralized control over the browser’s availability and functionality.
- Click the Windows Start Menu button.
- Type group policy and select the Edit group policy option that appears.
- In the sidebar on the left, expand Administrative Templates under the Computer Configuration section.

- Expand the Windows Components folder.
- Select Microsoft Edge from the list of options.
- On the right side of the window, locate and double-click on Allow Microsoft Edge to pre-launch at Windows startup when the system is idle, and each time Microsoft Edge is closed.
- A new window will appear.
- Click the Disabled button in the top left corner.
- Click the OK button in the bottom right corner to save your changes.

- Go back to the Group Policy Editor window.
- Locate and double-click the Allow Microsoft Edge to start and load the Start and New Tab page at Windows startup, and each time Microsoft Edge is closed entry.
- Click the Disabled button in the top left corner.
- Click the OK button in the bottom right corner to save your changes.
- Exit the Local Group Policy Editor app.


Turning off Microsoft Edge via the Group Policy Editor is a specialized task often reserved for network administrators or advanced users who must manage the browser’s behavior across multiple systems.
Stop Others From Being Able to Create Desktop Shortcuts
Desktop shortcuts provide quick access to applications, files, and folders, enhancing productivity and ease of use. However, in certain environments, such as shared computers in a workplace or educational institution, unrestricted creation of desktop shortcuts may lead to clutter or potential misuse.
To maintain a consistent and controlled desktop environment, administrators may wish to stop others from being able to create desktop shortcuts. Utilizing the Group Policy Editor, a powerful Windows tool for managing system settings, this guide will walk you through restricting the ability to create desktop shortcuts across multiple user accounts, ensuring a clean and standardized desktop experience.
- Click the Windows Start Menu button.
- Type group policy and select the Edit group policy option that appears.
- In the sidebar on the left, expand Administrative Templates under the User Configuration section.
- Expand the Control Panel folder.
- Select Personalization from the list.
- On the right side of the window, right-click or double-click the entry Prevent changing desktop icons.
- Click Enabled in the top right corner.
- Click the Apply button.
- Then click the OK button to save your changes.
- Exit the Local Group Policy Editor app.


Restricting the ability to create desktop shortcuts using the Group Policy Editor is a targeted approach to managing the user experience on shared or networked computers. It’s a task that requires careful consideration of user needs and organizational policies, balancing convenience with order and compliance. As with any changes to group policies, understanding the broader impact and communicating the change to users can foster a smooth transition.
Completely Remove Microsoft Edge From Windows
Whether it’s for compatibility issues, personal preferences, or system optimization, completely removing Microsoft Edge is a task that requires careful execution. This guide will provide step-by-step instructions to uninstall Microsoft Edge from your Windows computer, ensuring the process is carried out safely and effectively.
This task comes with responsibilities, as improper handling of command-line operations can lead to unintended system changes. Remember that actions taken within the command prompt should be approached with caution and understanding, as they can have far-reaching impacts on your system.
Using Command Prompt
- Open the Microsoft Edge app on your Windows computer.
- Click the three horizontal dots in the top right corner.
- From the menu that appears, highlight Help and feedback.
- Select About Microsoft Edge.
- Highlight and copy the Version Number, but don’t include the word “Version.”

- Right-click the Windows Start Menu button.
- From the list of options, highlight and select Terminal (Admin).

- When prompted, click the Yes button.
-
- cd/Program Files (x86)%\Microsoft\Edge\Application\VersionNumber\Installer

- cd/Program Files (x86)%\Microsoft\Edge\Application\VersionNumber\Installer
- Add a space to the end of the command.
-
- setup –uninstall –force-uninstall –system-level
- Press the Enter key.


Using Windows PowerShell
- Click the Windows Start Menu button.
- Search for powershell.
- Click the Run as Administrator button in the menu below the app listing.
- When prompted, click the Yes button.
-
- get-appxpackage edge

- get-appxpackage edge
- Locate PackageFullName from the results.
- Highlight and copy the name provided.
-
- Remove-appxpackage PackageFullName
- Press the Enter key to run the command.


Stop Edge From Reinstalling Itself
Whether it’s a matter of personal preference, system optimization, or compatibility with other software, stopping Edge from reinstalling itself requires a more advanced approach. By using the Windows Registry Editor, a powerful tool that allows users to modify the underlying settings of the operating system, you can prevent Edge from making an unwelcome return. Remember, working with the Registry Editor is a powerful but delicate operation, and it’s always wise to proceed with caution and awareness of the potential impacts.
This guide will provide detailed instructions on achieving this, ensuring that Edge stays off your system once removed.
- Press Win + R on your keyboard to open the Run dialog box.
- Type regedit and hit Enter to open the Registry Editor.
- In the panel on the left, locate and highlight HKEY_LOCAL_MACHINE > SOFTWARE > Microsoft.
- Right-click on the Microsoft Key.
- Highlight New.
- Select Key.
- Name the Key to EdgeUpdate
- Right-click the newly-created EdgeUpdate Key folder.
- Highlight New.
- Select DWORD (32-bit) Value.
- Name it DoNotUpdateToEdgeWithChromium.
- On the right side of the window, double-click the DWORD entry.
- Enter 1 in the Value data field.

- Click the OK button to save the changes.


Stopping Microsoft Edge from reinstalling itself using the Registry Editor is a task that offers a definitive solution to a common challenge. It’s a process that requires careful navigation and a clear understanding of the Windows Registry, as improper changes can lead to system instability.
Conclusion
Microsoft Edge appearing on your desktop unexpectedly can be a frustrating experience. But with the methods outlined above, you should be able to resolve the issue and fix the Microsoft Edge keeps appearing on desktop. It’s always a good idea to start with the most straightforward solutions, like updating or resetting the browser, before moving on to more drastic measures like reinstalling. With patience and troubleshooting, you can enjoy a seamless browsing experience with Microsoft Edge again.