

Windows Automatic Repair is a very handy troubleshooting tool that you can use to repair boot errors. Unfortunately, Automatic Repair may sometimes fail to work as intended. For example, the tool may fail to detect the administrator account associated with your computer. If you’re experiencing similar issues, you’ve come to the right place. Follow the steps below to solve the problem.
Contents
Windows 10 Automatic Repair Says There’s No Admin Account
Enter Safe Mode and Repair Your System
- Press and hold the power button until your device shuts down completely. This should not take more than 10 seconds.
- Repeat this step three or five times until the Recovery Environment options appear on the screen.
- Note: If this method doesn’t work, turn off your computer using the Power button. Then press and hold the power button for twenty seconds. Wait for 10 seconds and restart your computer.
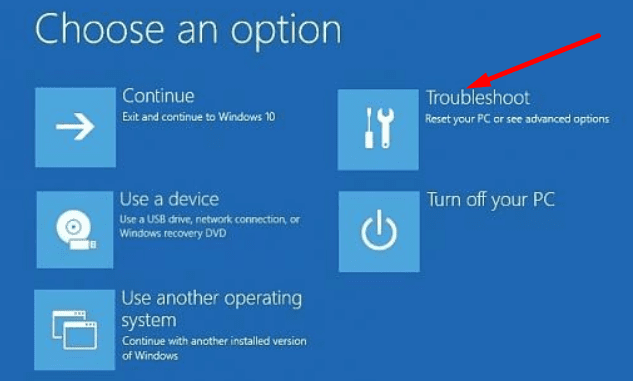
- Once the Recovery Environment is available, navigate to Troubleshoot.

- Select Advanced options, and then go to Reset this PC.
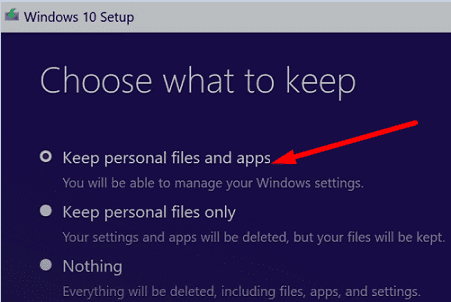
- Select the first option, Keep personal files and apps.

- Hit the Reset button and check if the issue persists.
⇒ Note: If you go to Advanced options, you won’t be able to use System Repair, Startup Repair, or Command Prompt because you need to log in to an admin account first. That’s why you’re forced to use the reset option.
Clean Install Windows
If the issue persists, you need to reinstall Windows from scratch. But before you do that, back up important files. If Windows won’t start, you can use an external USB drive to rescue your files.
Step 1: Backup Your Files if Windows Won’t Start
- Press and hold the power button until your computer turns off.
- Then press the power button again to power on the device.
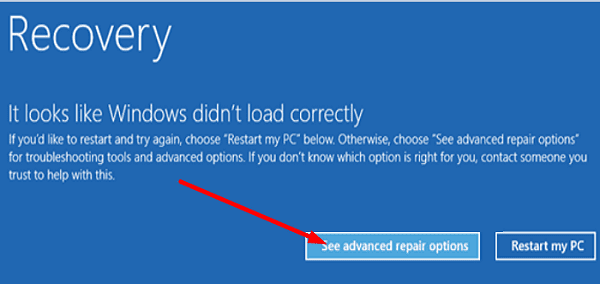
- Repeat these steps up to three times until you see the Windows logo or “Please wait” screen.
- Then click on See advanced repair options.

- Select Command Prompt.
- Note: Keep in mind that this option may not be available for all users.
- Type notepad.exe in the CMD window to launch Notepad.
- Click on the File menu in Notepad, and select Open.
- Use the new mini File Explorer window to locate the folders or files you want to back up to your USB drive.
- Right-click on the respective file or folder, and select Send to USB drive.
- Note: There will be no visible progress bar, and your device appears to be frozen during copying. Wait it out, and your computer should unfreeze once your files have been copied.
Step 2: Clean Install Windows via USB Installation Media
You need access to a second computer to download the Media Creation tool. Simply follow the on-screen instructions to create the USB installation media. You can then use the installation media to reinstall Windows 10 on the problematic computer.
Now, insert the USB installation media on your computer. Boot your machine from the USB installation media and hit the Install Now button. Follow the on-screen steps to complete the process.

After clean installing the OS, you need to configure your settings and create a new account. Use the out-of-box experience to get the job done.
Conclusion
If Windows Automatic Repair won’t detect your admin account, boot into Recovery Mode and use the reset option. You can choose to keep your apps and files if you want to. If the problem persists, you need to clean install Windows. But don’t forget to back up your data first. Did you manage to solve the problem? Let us know in the comments below.


Trying guys windows 10 is a messed up one don’t try it on low-end pc I swear????????????
No it did not
Noooo!
This most definately does NOT work
no it did not
No for any thing it is asking for admin account. I am stuck and do t know what to do. Yesterday night my windows 10 automatically installed some updates and today it’s on recovery loop. Please help me I really need it to be working again.
No did not help
First part before usb, my computer all option call for administrator account!!!
This helps, thanks a lot!