

Your Windows computer may sometimes lock itself randomly. Your machine simply goes to the lock screen and requires you to enter your passcode. This issue is even more annoying if it occurs when you’re watching a movie or working on a substantial project. Now, let’s see how you can prevent your computer from locking itself.
Contents
Fix: My Windows Computer Keeps Locking Itself
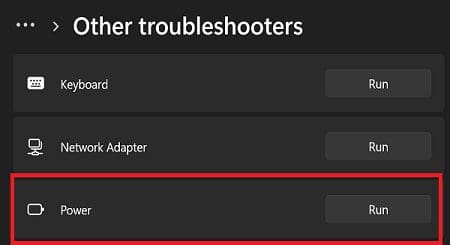
Run the Power Troubleshooter
Try running the built-in Power troubleshooter and check if it solves the problem.
- Go to Settings
- Select System
- Click on Troubleshoot
- Then, click on Other troubleshooters
- Run the Power troubleshooter
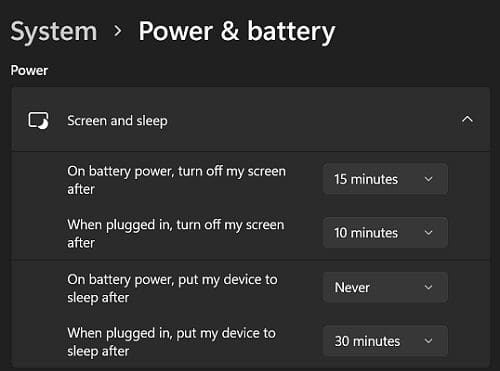
Check Your Power Settings
Navigate to Power & Sleep settings and tweak your settings to prevent your computer from entering Sleep Mode on its own.
- Go to Settings
- Select System
- Then, select Power & Battery
- Select Screen & Sleep
- Set all the Power options to Never
Alternatively, you can also go to Control Panel → Hardware and Sound → Power Options and then, select your current power plan and tweak your settings.
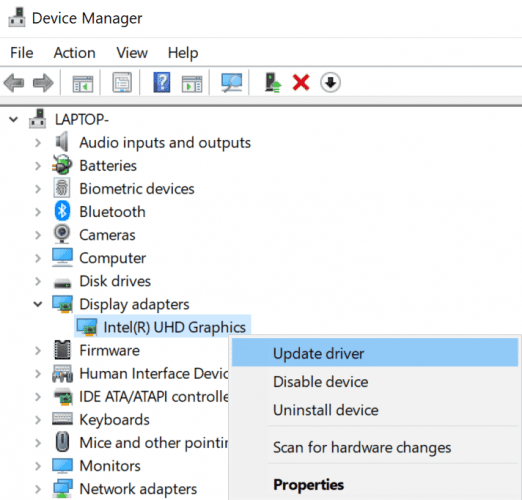
Update Your Display Driver
Sleep Mode is controlled by the display driver. Make sure to update your driver to the latest version, and check if you notice any improvements.
- Open the Device Manager
- Expand the list of Display Adapters
- Right-click on the Display Adapter
- Select Update Driver

- Select the option that automatically searches for the latest driver version
- Restart your computer after updating your driver
However, if the issue persists, try reinstalling your display driver. Right-click again on your Display Adapter, select Uninstall device, and restart your machine.
Disable Hibernation
- Launch Command Prompt with admin rights
- Hit Continue on the User Account Control window
- Type powercfg -h off or powercfg.exe /hibernate off and hit Enter

In an administrative command prompt, run the command “powercfg.exe /hibernate off.” - Wait for 30 seconds and restart your computer
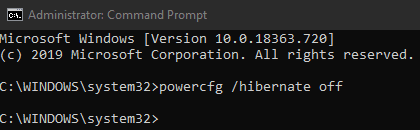
Immediately check if disabling hibernation solves the problem.
Check If This Glitch Is Caused by an Update
If your computer started locking itself after installing the latest updates, maybe one of the updates is causing this issue.
- Navigate to Settings
- Select Windows Update
- Click on Windows Update under Update History
- Uninstall recently installed updates
If this issue is caused by a service update, you have 10 days to roll back. Go to Settings, select System, click on Recovery, and hit the Go back button.
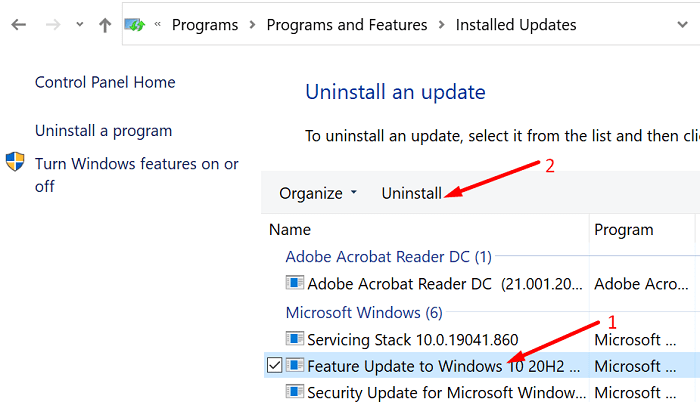
Alternatively, you can also go to Control Panel, select Programs, and Features, and click on Installed Updates. Then, select the update you want to remove and hit the Uninstall button.
Clean Boot Your Computer
Check if one of the programs installed on your computer is forcing your device to enter Sleep mode. For example, if you’re using a system optimizer such as Dell Optimizer, disable it and check if you notice any improvements.
For more information on cleaning boot your machine, see What is a Windows Clean Boot and How to Perform One.
Conclusion
In brief, To fix the issue where your computer locks itself randomly, run the built-in Power troubleshooter. Then, tweak your power settings to prevent your computer entering Sleep Mode. Additionally, update or reinstall your display driver, and disable Hibernation. However, if the issue persists, uninstall the latest updates and clean boot your computer.
Did you manage to solve the problem and prevent your machine from locking itself? Let us know in the comments below.


Worked my way down the list, and the hibernation disable seemed to do the trick.
Glad it worked, the lock screen was beginning to come on with annoying regularity.
(Windows 10, version 22H2, Intel(R)-Core i5-8400 processor).
Thanks!
Yes, ‘hibernate off’ did the trick for me.Thank you for your excellent article!
No helphel as Locked so can’t get anything on screen
I have done all suggested, and on some computers, it still locks, every night.
I Couldn’t restart now computer. But will know exactly on next restart.