
Does your work involve editing documents in Microsoft Word? Learn how to enable the track changes mode in Word.
Since Microsoft Word is a document management software, users need to make a lot of changes to it. Often, it becomes difficult to keep track of the changes made to a document. To help you with this, Microsoft offers a track changes feature.
With this feature, you can track and view all changes that are made to the document. It’s a feature that comes in handy when editing a document as a team. In this article, I’ll tell you how to enable track changes mode in Word using different methods. Also, I’ll describe this feature and tell you why you need this.
Contents
What Is Track Changes in Word?
Track Changes is a feature of Microsoft Word that helps you track all the changes made to a document or Word file. Whether you are the only one using a document or have a bunch of collaborators working on it, this feature could be used to keep track of any changes.
There are different ways how track changes can be displayed on your document. It also lets you control which changes to be tracked and how you can accept or reject the changes. Besides enabling this feature, you can also choose from the available options for your preferred mode.
Who Needs to Use Track Changes in Word?
Using track changes, you can see which changes have been made to your document by the collaborators. It also helps you visualize each edit and individual change so that you can make the final call on whether to keep or reject them.
Anyone using Word for document editing will find this feature to be extremely beneficial. If you’re working on a thesis and frequently send your dissertation to your supervisor in MS Word, track changes will help you understand the changes they want in your paper.
Another popular use case of track changes mode is for freelancers or contractors. If you’re a content writer, social media content writer, or email marketer, you can send your drafts to the client, and they can make the necessary changes. All their suggestions can be added to the file, and as you accept them, your action will also get tracked.
Business and legal documents also need the track changes mode if those involve multiple collaborators. When more than one person is working on a document, track changes help you understand who made which changes at what point in time. It will help you avoid any confusion and miscommunication.
Enable Track Changes Mode in Word With Best Methods
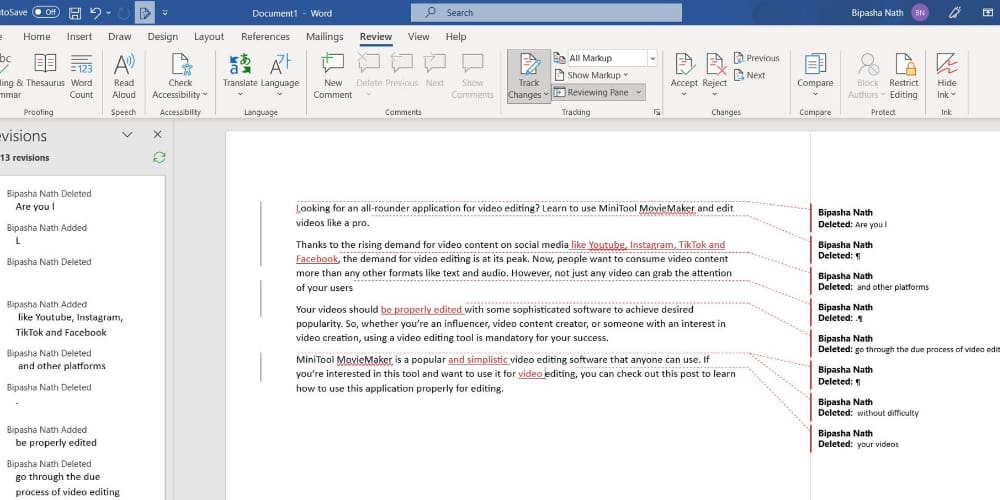
Method 1: Use the Review Tab
- Open any document on Microsoft Word.
- Click on the Review tab.

Click on the Track Changes button to enable Track Changes mode - Click on the Track Changes button to enable this mode.
- You can also decide how you want to see the changes in your document by choosing any of the following options from the Display for Review section. The options are Simple markup, All Markup, No Markup, and Original.
- Click on Show Markup drop-down menu to select which changes to markup from Comments, Formatting, and Insertions and Deletions.
- You can also enable Reviewing Pane to see all the changes in one place. Click on it to enable the option. You can even choose the pane to be placed vertically or horizontally from the drop-down menu.

Method 2: Use the Keyboard Shortcut
If you don’t want to go through these steps, Word has a simple solution for you. There is a keyboard shortcut for track changes which is CTRL + Shift + E. Press these keys together when a Word document is open, and track changes will be enabled immediately.
Method 3: Use Status Bar
You can enable the track changes feature from the Status Bar of your Word document as well.
- Open the Word document where you want to enable track changes.
- Look at your Status Bar to find Track Changes: Off.

Look at your Status Bar to find and click on Track Changes Off to enable Track Changes - Click on that option to change it to Track Changes: On.

Remember, to apply this method, your Status Bar should be customized to display the Track Changes mode. If you can’t find it there, here is what you need to do to make this mode visible.
- From the Word file, right-click on anywhere in the Status Bar.
- In Customize Status Bar list, click on Track Changes.
- A tick mark will appear beside it, and the Track Changes option will be visible on Status Bar.
Method 4: Use Quick Access Toolbar
Quick Access Toolbar or QAT is another way to enable track changes on any Word file in a seamless manner. This toolbar is the topmost bar of the Word file that also contains the Word file name and search field.
- Locate the Track Changes icon from the QAT of your Word file.
- To confirm, you can place the cursor over the available icons on that toolbar and find out the one that says Track Changes.
- Once you’ve found it, click on the Track Changes icon once.

Click on the Track Changes icon once - This will enable the Track Changes feature. The icon will also get highlighted.
If you’re unable to find the Track Changes icon on the Quick Access Toolbar, you can add it there using the following steps:
- On Word Quick Access Toolbar, click on the drop-down menu.
- On Customize Quick Access Toolbar list, select More Commands…
- In the Choose commands from the list, find and select Track Changes.
- Click on Add >> button located between the two columns.
- Now, you’ll see the Track Changes in the Customize Quick Access Toolbar column on the right.
- Click on the OK button to confirm the changes. The wizard will close, and you’ll see Track Changes icon on the QAT.
FAQs on Enabling Track Changes in Word
Why is “Tracking” missing from my Word ribbon?
In Microsoft Outlook 2007 through 2016, you can customize the ribbon. That means that the “Track Changes” option can be removed and not exist on your computer. You can often add it back by going to the “Customize Quick Access Toolbar” arrow, then choosing “More Commands“.
From there, you can choose “Customize Ribbon“, then add the “Track Changes” section. You could also use the “Reset” button on this screen to reset your customization back to default settings.
Conclusion
If you use Microsoft Word for collaborative document creation, track changes is a useful feature for you. It helps you keep track of the changes made to a document by you or any other collaborators.
If you don’t know how to enable track changes in Word, check out the methods mentioned here. You can follow any of these approaches and enable track changes with ease. In case you’re aware of any other technique for track changing, share it with us in the comment.
Also, share this article with your family and friends who uses Microsoft Word. Here are some other articles that you can read, such as how to add and remove page breaks and how to enable equation editor.


Yeah, it was very helpful