Scheduling an email on Gmail can be very useful. You need to send one, but not at the moment. Since you don’t want to risk forgetting to send it, you decide you want to schedule it. The good news is that you don’t have to install additional add-ons or software to get the job done. Gmail has the feature built-in.
Contents
How to Schedule an Email on Gmail
By scheduling an email for a later time, you make sure that it’s sent whether you remember or not. This is a real lifesaver when it’s something important. You already have enough things to do, and not worrying about sending an email is great.
Once Gmail is open, create a new email like you usually would. Once you’re done, click on the dropdown menu to the right of the send button. Click on the Schedule Send button.

When you click on the button, you will see various time options. You can choose from integrated options such as tomorrow morning, tomorrow afternoon, or a few days later. f you’re not happy with any of the suggested times, you can always choose the Pick dates and time option to choose a better time.

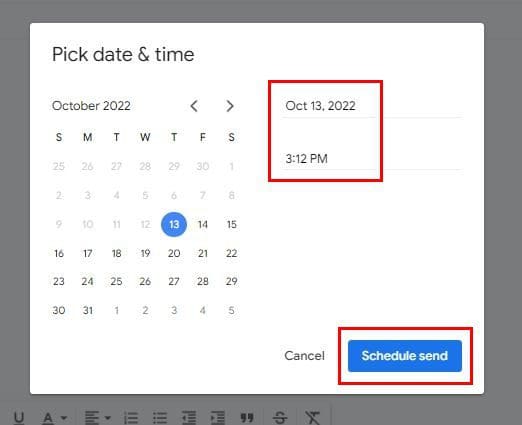
Next, you’ll see a calendar so you can choose the date you want to send the email and the date. You can manually enter the time and date and change if the time is in the morning or afternoon (AM or PM). Once you’re done entering the necessary information, don’t forget to click on the blue schedule send button at the bottom right.
How to View The Schedules Email in Gmail
If you scheduled various emails, but want to make sure that you scheduled a specific email, here’s where you can check. Once the email is sent, you’ll be back at the primary age. Below the compose option, you’ll see various options such as Inbox, Starred, Snooze, and Sent, followed by Scheduled. You’ll also see how many emails you have scheduled.

When you click on the Scheduled option, you can do things such as:
- Cancel Send
- Mark as unread
- Snooze
- View the Email
- Add to tasks
- Add to Inbox
- Labels
- Add star
- Create event
- Filter messages like these
- Mute
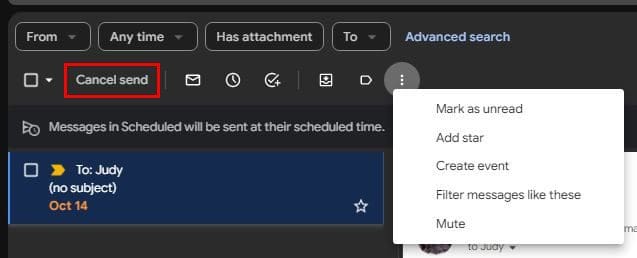
When you view the email, you can see the time it was scheduled for, and to the right, you’ll see another option to cancel sending it.

If you want to edit the email and not cancel the email, you’ll still need to cancel the send to edit the email. Once you click on the Cancel Send option, you’ll regain access to the email to make any necessary changes.
How to Schedule Emails in Gmail – Android
It’s also possible to schedule your emails on your Android device. Once the app is open, compose your email like you usually would. Tap on the dots at the top right and tap on the Schedule send option. You’ll see sending options such as tomorrow morning, tomorrow afternoon, or Monday morning, or you can pick your date and time. Once you’ve set the time and date, tap on the Schedule send option.

When you want to see your scheduled emails, tap on the three-lined menu at the top left. When the side menu appears, look for the scheduled option. You should also see how many emails are scheduled to be sent. If you want to change the email, you’ll also need to cancel the send. The email will go to drafts; you’ll need to tap on the pencil icon to make the necessary changes.

Conclusion
There are emails you can’t forget to send. But, with so many things you need to get done, you can easily forget to send one. By scheduling the email ahead of time, you don’t have to worry about not sending it since Gmail will do it for you. It’s possible to schedule an email from your computer or your Android device. From what device will you be scheduling your emails? Share your thoughts in the comments below, and don’t forget to share the article with others on social media.