You can finally eliminate unwanted distractions by enabling Do Not Disturb on your iPad. Do Not Disturb includes choosing what apps and people will be allowed to get through. You can also customize your screens to help limit distractions and set a schedule so it turns on even if you forget. There are also focus filters you can use. Let’s see how you can turn on do not disturb and customize it.
Contents
How to Enable Do Not Disturb on iPad
Do Not Disturb on iPad can be very useful since it can stop notifications, calls, or alerts from interrupting your meetings and let you get a good night’s sleep. If you don’t like to turn your iPad off completely, you can set up a schedule so nothing gets through while you sleep. Also, the feature helps you improve battery life since it reduces power usage by limiting what gets through.
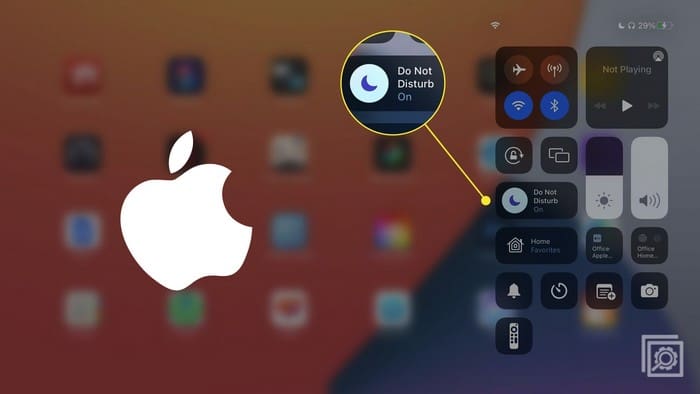
Enabling do not disturb on iPad is quick and easy. Open the Control Center by swiping down from the top right of your display. Tap on Focus, followed by Do Not Disturb.

The option will turn white and indicate that it’s on. Tapping on the dots gives you control over how long you’ll leave it on. You can choose from options such as:
- For an hour
- Until this evening
- Until I leave this location

You’ll know it’s on since you’ll see a moon next to the battery percentage at the top right.
How to Customize Do Not Disturb on iPad
You can customize how the feature works by going to Settings. Once in Settings, tap on Focus (from the list of options on your left). Tap on Do Not Disturb; the first thing you can start customizing is the notifications. The first type of notification you can customize is the People option. Choose whether you want to allow notifications from certain people or silence notifications from certain people. Once you’ve chosen, tap the Add People option and add contacts.
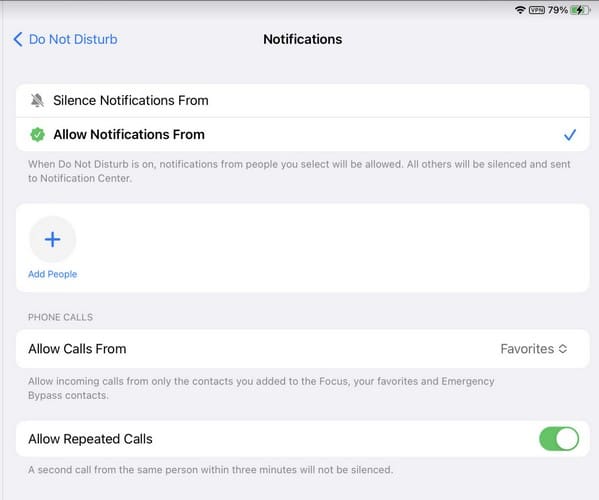
Below you’ll also see an option to allow calls from certain people. The default option will be set to Favorites, but tap on the option and choose from options such as:
- Everybody
- Allowed People Only
- Favorites
- Contacts Only
- Work
At the bottom, you’ll see the option to toggle on Allow Repeated Calls. That’s it when customizing your notifications with iPad’s Do Not Disturb.
How to Customize Screen When Using Do Not Disturb on iPad
Tap the Edit option if you already have a screen in the Customize Screens section. Suppose you don’t tap on the Choose option to begin. You can choose the home pages you want to access on the next page. For example, you can select the one with only the apps you need.
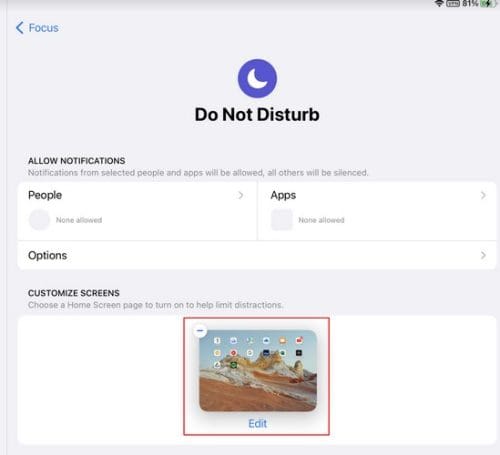
It’s a good idea not to include the home screen with all the games you like to play if you want to finish some work. You can choose more than one home page. The home screens you choose will appear in the Customize Screen section with a minus icon. If you change your mind and want to remove a screen, tap on the minus icon. The screens included in this section are the only ones you’ll see as long as Do Not Disturb is on.
How to Set Up a Schedule for Do Not Disturb on iPad
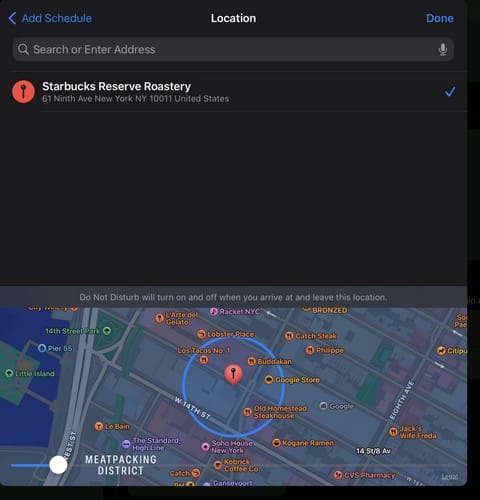
You can create your schedule by going to Settings > Focus > Do Not Disturb > Set a Schedule. Tap the Add Schedule option and choose how to start this schedule. You can have it start at a specific time, be at a particular location, or use a particular app. This last option will enable the Do Not Disturb feature when you use a specific app.
Time: If you want to set up the Do Not Disturb Feature using the time, you’ll need to choose a from and to time. Remember to add the days you want to apply the schedule.
Location: To set a location add the address of the place where you need to be for the Do Not Disturb feature to turn on. Choose the location from the listed option to add it to the list, and tap on the Done option at the top right. If you forget what address you entered, go back to Do Not Disturb, and it’ll be listed under Set a Schedule. On the list, you’ll also see that it’ll say it’s on. That means that if you don’t want Do Not Disturb to turn on when at this location, select the address and toggle it off.
App: The last option is simple to use. When your iPad detects that you’ve started using the app you added, it’ll automatically enable Do Not Disturb. A drawback is that you can’t choose from than one app at a time, so you need to repeat the process for various apps.
How to Use Focus Filters for Do Not Disturb on iPad
The last option in Do Not Disturb is Focus Filters. When you open this option, you’ll see options for:
- Calendar
- Messages
- Safari
- Appearance
- Low Power Mode
You can decide what calendars, emails, etc., you can see when Do Not Disturb is on. For example, you can determine what calendars you want to see if you filter the calendar option. Maybe you only want to see your Personal Calendar and hide the Work Calendars to disconnect and spend time with the family. The same applies to the remaining options listed above.
At the bottom of Focus Filters, you’ll also see the System Filters section. When Do Not Disturb is on, you can enable dark or light mode or enable low power mode. Even though these steps are explained for an iPad, the same steps can be followed for an iPhone as well.
Further Reading
There are other places where you can set up Do Not Disturb as well. For example, here is how you can configure workplace do not disturb hours for Slack. It’s also possible to set up Do Not Disturb on Zoom.
Conclusion
It can be tough to separate work from personal stuff. You might be tempted to answer that email when you should be relaxing. But with Do Not Disturb, you can decide what notifications you receive and what people can contact you. You can also modify Do Not Disturb even after you’ve been using it for a while.