You may need to flip an image on Microsoft Word for several reasons. Maybe you can only get the right angle by flipping it, but the good news is that it can easily be done in Word. Microsoft Word has a short list of editing options, but you can flip an image and adjust the surrounding text in various ways. You can add stock images Word has or upload one from your computer’s gallery, but if you choose the wrong one, you can always replace it. Please keep reading to see how you can add and rotate a photo in different directions.
Contents
How to Flip an Image on Microsoft Word
Rotating an image on Microsoft Word is quick and easy. Once the Word document is open, click on the Insert tab at the top, followed by the Pictures option. Click on the arrow pointing down to see where you can upload the images from:
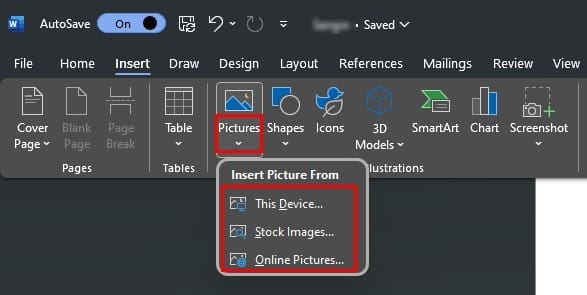
- This device
- Stock images
- Online images
Once you’ve chosen and added your image, it’s time to learn how to rotate it. One way is to click on the image and the arrow that forms a circle. Drag the icon in a circular motion, and the image will rotate right or left. You can leave it in any position you want. If the circular arrow disappears, click on the image to see it.
![]()
Additional Roating Options
Another option to rotate the image is to click on the image and the Picture Format tab at the top. To the right, you should see an option called Rotate. Click on it, and you’ll see different degrees to rotate the image. You can choose from options such as:

• Rotate right 90 degrees
• Rotate left 90 degrees
• And Rotate vertically and horizontally
You’ll also see another option to access additional rotating options to flip an image on Microsoft Word. When you click on this option, you’ll see three different tabs. You’ll see a Position, Text Wrapping, and Size tab. Each tab will have various things you can change, such as height, width, and rotation. When you click on the size tab, you can use the up and down arrows to make your image as big or as small as you’d like.
Once done, click the OK button at the bottom right to save your changes. If you made a mistake and want to undo what you did, select the image and press the Crtl + Z keys. After you press the keys, whatever change was applied should be undone.
How to Adjust How the Text Interacts With the Image
If your image is surrounded by text, the layout could be affected. If you’re unhappy with how your Word document looks after rotating the image, here are some options to change how your text interacts with the image. To access these options, click on the image, and on the icon in the shape of what looks like a rainbow will appear at the top right of the image.

The rainbow-looking icon is the layout option. When you click on it, you’ll see options to adjust the text in line with text or with text wrapping. Choose the one that best fits your needs, and at the bottom, you can also choose between options such as move with text or fixed position on the page.
Further Reading
If we’re on the subject of images, there are other things you can do on Microsoft Word when it comes to images. For example, here is how to quickly erase all images in a Word document; in case you added the wrong pictures, I need to start over. For Signal users, here are some tips on editing images on Signal before sending them. Are animated images and emojis getting on your nerves on Slack? Here, you can turn off animated pictures and emojis to set things up just how you like them.
Conclusion
There are several reasons why you may need to rotate an image. You may be working on a project for school or work and can only get the perfect angle by rotating your image. Unfortunately, Word doesn’t have a long list of editing options, but if you need to rotate the image without making many changes, it can quickly be done on Word without turning to 3rd party software. So, how many pictures did you have to rotate on your Word document? Let me know in the comments below, and Please remember to share the article with others on social media.