
You can send out an email to allow recipients to cast a vote from the message in Microsoft Outlook 365.
Note: The steps presented work for the Microsoft Outlook 365 desktop client and web-based version.
- Start a new message and select “Options“.
- Select “Use Voting Buttons“.
- Select the voting buttons you wish to use. Use “Custom…” if you wish to write your own options.
 4. If you have selected the “Custom…” option, the “Message Options” dialog will appear. Type the options you would like in the “Use voting buttons” field. Separate your options with a semicolon (;). Select “Close” when done.

 4. If you have selected the “Custom…” option, the “Message Options” dialog will appear. Type the options you would like in the “Use voting buttons” field. Separate your options with a semicolon (;). Select “Close” when done.
Now you’re ready to type and send the email. When the recipient opens the message in Microsoft Outlook, it will show a “Vote” button on the top ribbon bar.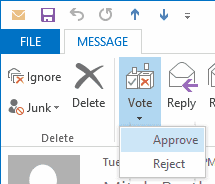
FAQ
How do I view the voting results?
Select the Sent folder, then open the message, then select Tracking.


I have Outlook 2016. I added the voting buttons “Yes;No” and sent the email to 12 people who also have Outlook (may or may not be Outlook 2016).
When I check the email that I sent, and go to the “Tracking” button, it shows that 8 of 12 voted and the response.
However, 4 people that show as not voting in my Tracking check, say that they DID vote and the sent me the email to prove it.
Why do they not show up in my Tracking button in my original sent email?