

Not being able to access network shares can be really annoying. For example, if other computers can detect the shared folders and yours cannot, you need to fix this issue. In this guide, we’ll show you how you can solve this problem.
Contents
Use the same sharing protocol
First of all, make sure all the computers are using the same sharing protocol. That is to say, there should be no incompatibility issues at this level.
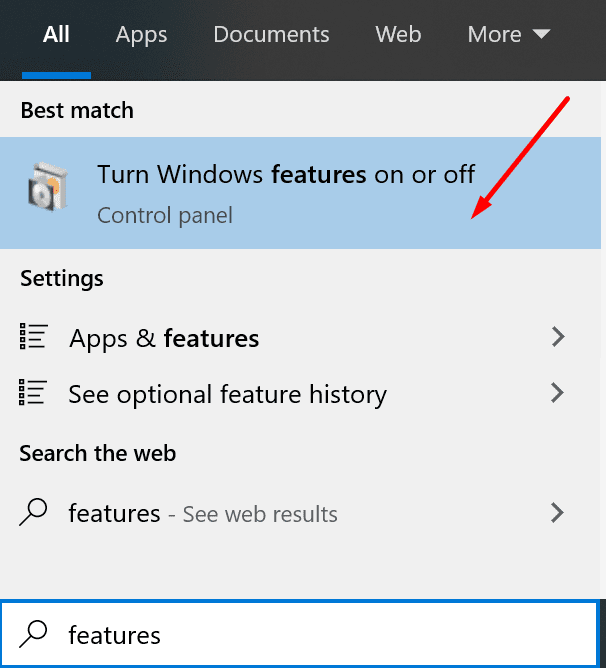
- First, type features in the Windows search box.
- Select Turn Windows features on and off.

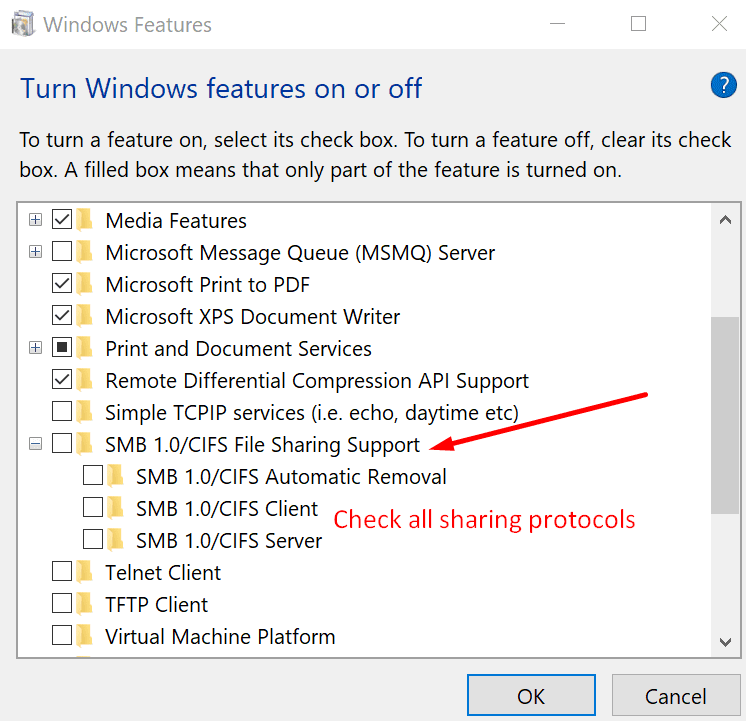
- Then expand the \SMB 1.0/CIFS File Sharing Support category.
- The next step is to check all the options. As a result, your computer will support all the sharing protocols.

- Apply the changes and restart your computer.
Enable Public Sharing
If the public sharing feature is disabled, certain folders may not visible over the network.
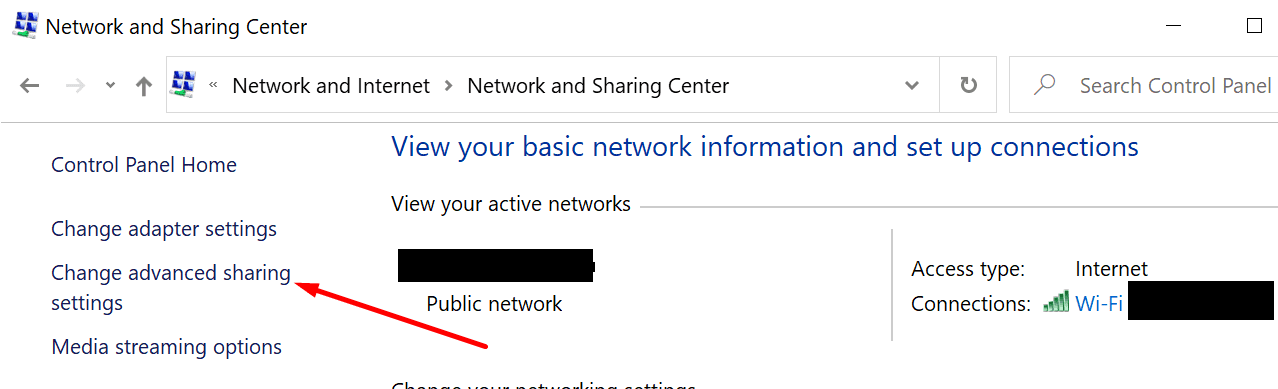
- The first step is to launch the Control Panel.
- Then go to Network and Internet.
- Select Network and Sharing Center.
- Go to Change advanced sharing settings.

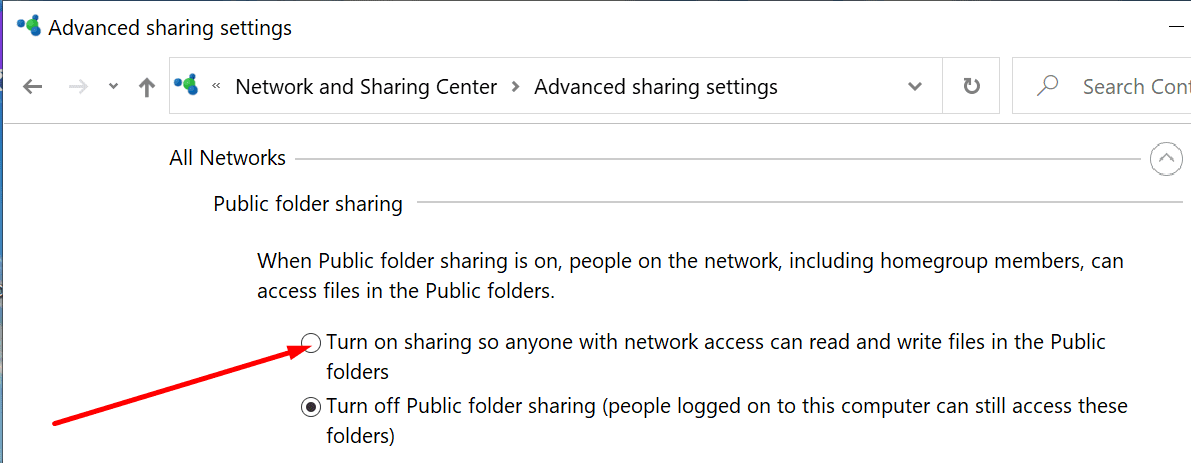
- After that, expand All networks.
- Locate the Public folder sharing option and make sure it’s checked.

- Then restart your computer.
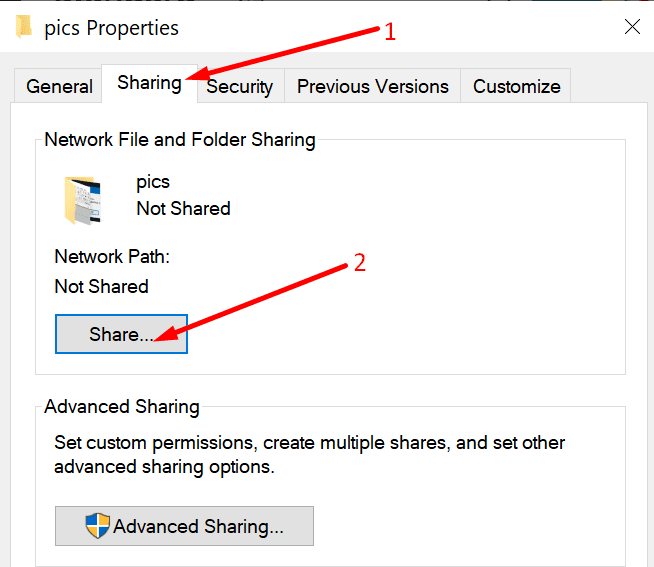
Check the sharing settings for individual folders
Equally important, make sure to check the sharing settings for the folder you’re trying to share.
- Right-click on the folder.
- Then click on the Sharing Tab.
- Hit the Share button.

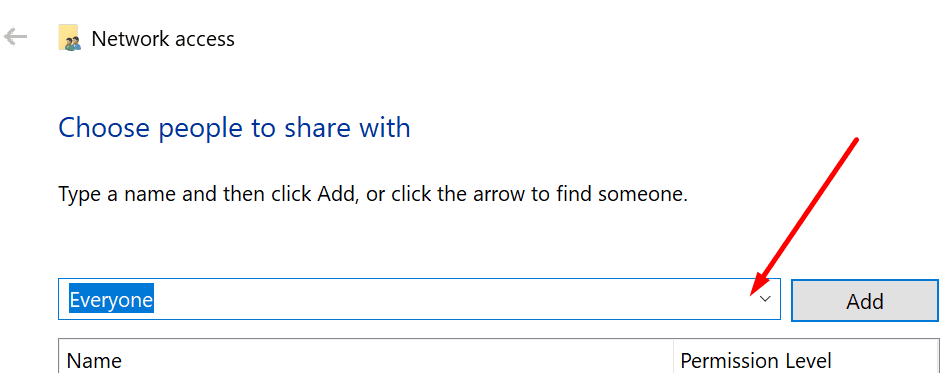
- Go to Choose people to share with.
- Select Everyone from the drop-down menu.

- Go to Advanced Sharing.
- Check the Share this folder option.
- Go to Permissions and make sure it’s set to Everyone.
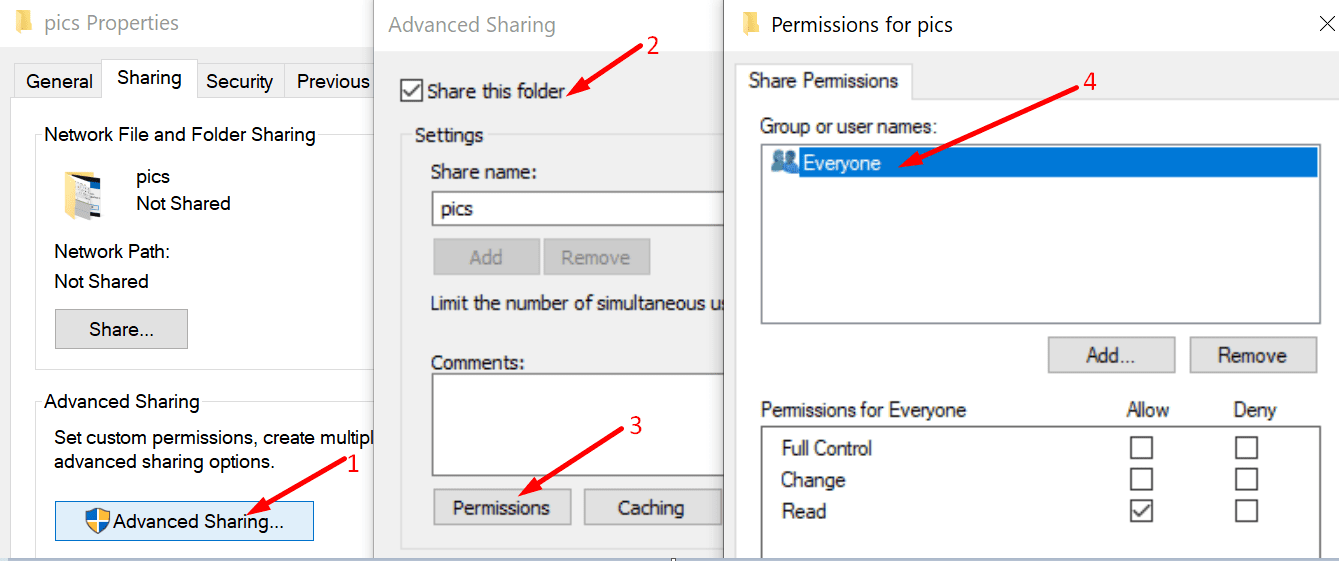
If you can’t find the Permissions tab, click on the Add option. Then, click on Advanced, and then Find Now. The computer will list all the users. Select Everyone and you’re ready to go.
Disable your firewall
Some users said that disabling the firewall did the trick. If you’re using Windows 10’s built-in firewall, open the Control Panel. Select Turn Windows Defender Firewall on and off.
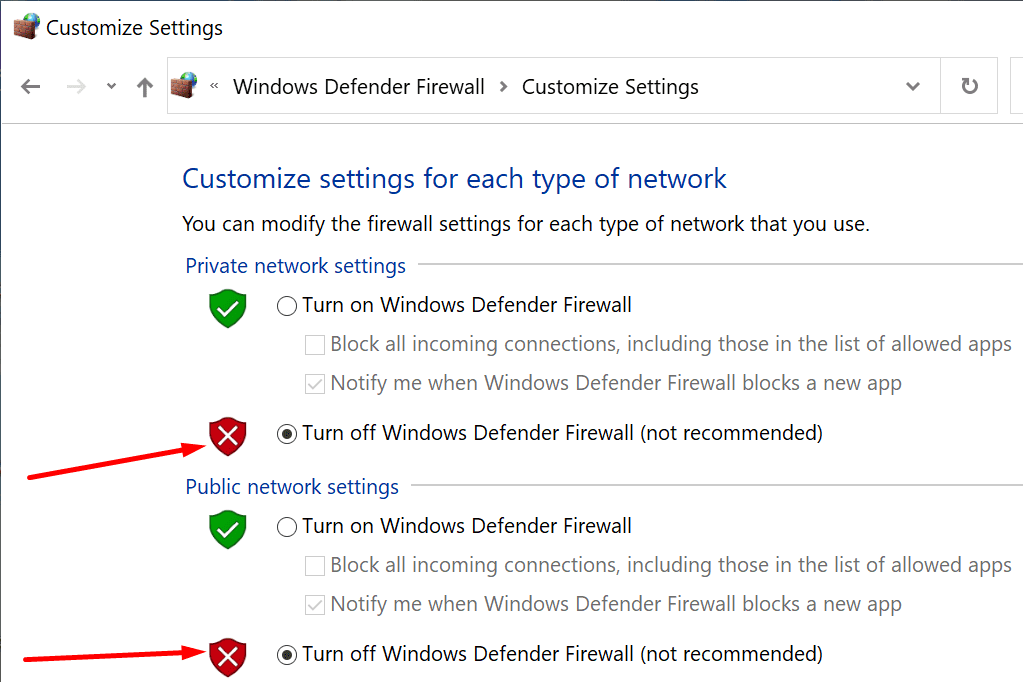
You can then disable the firewall, and restart your computer. Check if the network shares are visible now.
Enable LanMan Workstation
This policy allows users to block or accept insecure guest logons. It could be the reason why users can’t access network shares.
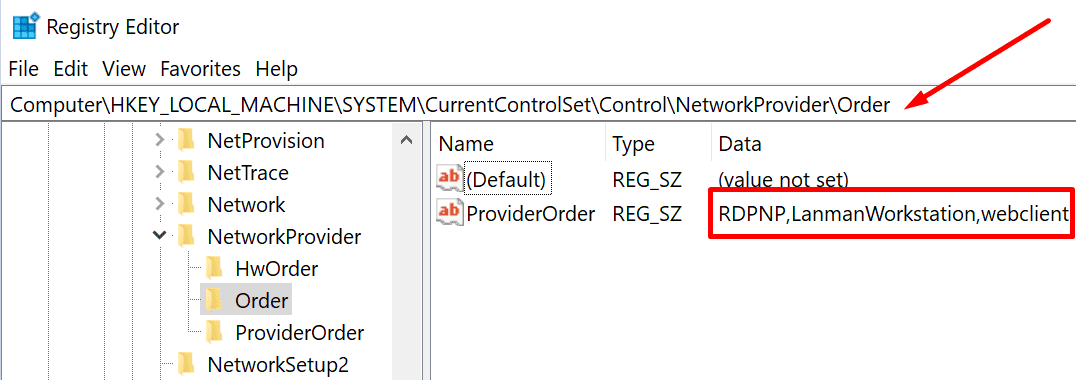
- To check if the policy is enabled, enter regedit in the Windows search box and launch the Registry Editor.
- Next, go to HKLM\SYSTEM\CurrentControlSet\Control\NetworkProvider\Order and HKLM\SYSTEM\CurrentControlSet\Control\NetworkProvider\HWOrder
- Check if the RDPNP,LanmanWorkstation value is set for both of these keys.
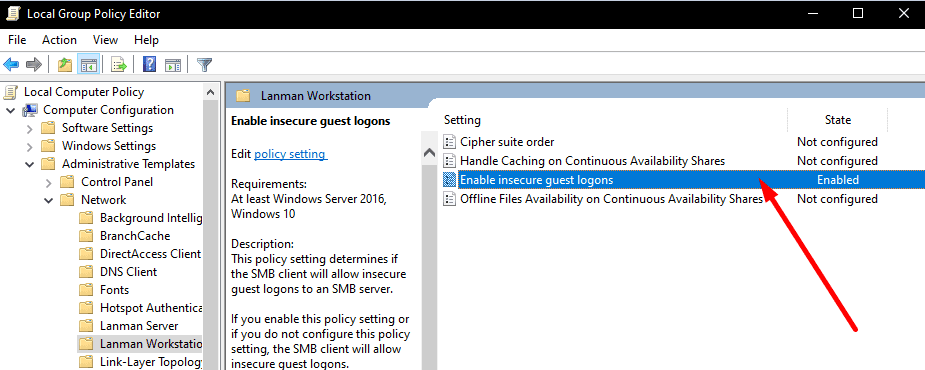
If it’s not, you can enable it via the Group Policy Editor.
- Press Windows + R and type gpedit.msc in the Run window
- Press Enter to open the editor
- Go to
ComputerConfiguration\Administrative Templates\Network\Lanman Workstation - Double click on Enable insecure guest logons

- Set the option to Enabled
- Save the changes and restart your computer.
In case the Group Policy Editor fails to edit the Lanman Registry key, follow the steps below. Use the same steps if GPEdit is not available on your computer.
- Open the Registry Editor (type regedit in the Windows search bar and select the Registry Editor)
- Go to HKEY_LOCAL_MACHINE\SYSTEM\CurrentControlSet\Services\LanmanWorkstation\Parameters
- Then locate the AllowInsecureGuestAuth key

- Double-click on it and make sure the DWORD value is set to 1.
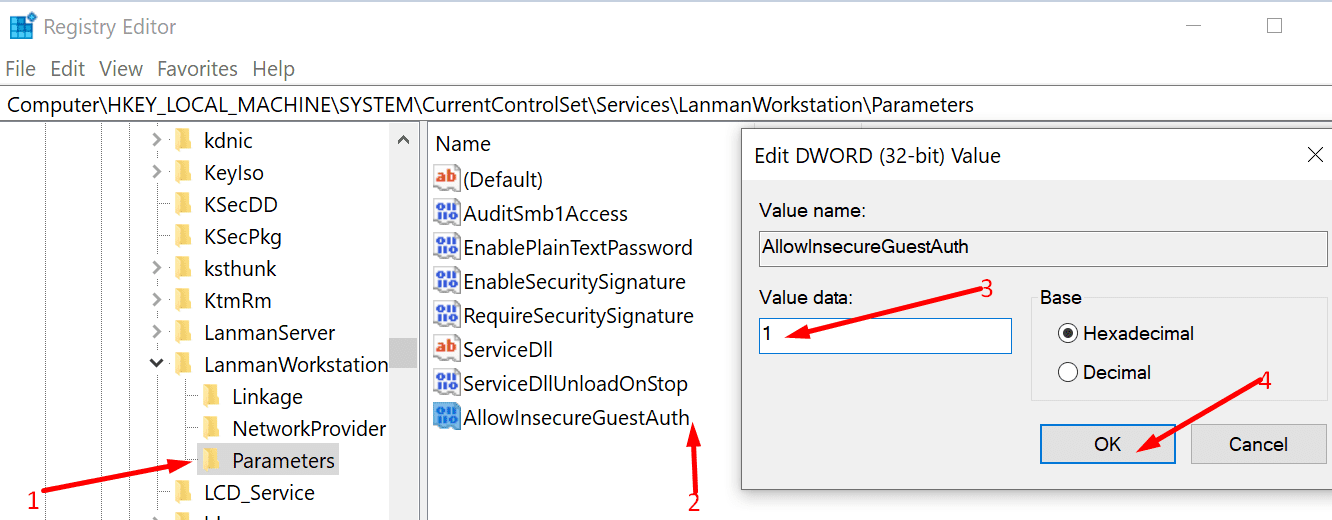
Of course, if the AllowInsecureGuestAuth key is not visible, you need to create it yourself. Right-click on Parameters → New → DWORD Value.
In conclusion, fixing any sharing protocol issues is crucial. Certainly, the sharing settings for individual folders are worth checking as well.
Meanwhile, let us know if you managed to fix this problem with the help of this guide.
Mitch, can’t thank you enough.
I have visited MANY tech support sites that were little or NO help.
Your thorough guide on fixing network share problems is the BEST.
Now I don’t have to “sneaker-net” files out to the shop with the CNC computer.
I can connect and open shared network using this: \\ComputerName (or IP Address)\drive.
But I cannot connect to : \\ComputerName (or IP Address)
The error message:
\\ComputerName (or IP Address) is not accessible. You might not have permission to use this network resource. Contact the administrator of this server to find out if you have access permissions.
Access is denied.
Finally!!!!
Tried many things only Enable LanMan Workstation help.
Thank you!
I tried everything, but it wasn’t until I disabled Windows (10) Firewall on my private network that it started working (being able to see my other network device from Windows File Explorer). Unfortunately, I did that last. I should have done it first.
I followed everything to the letter and I am still not able to share a folder, I even shut off McAfee firewall and still nothing
Thanks a lot, it worked for me.
This was a great help! Ended up being “Enable LanMan Workstation”. Once I did that I was able to connect to network share drive. Big thanks!
Months of researching. Enable LanMan Workstation was the answer for me. Madalina Dinita, thank you for this article.
This tutorial was very helpful.
I recently installed Ubuntu Server 20.04 Focal Fossa with a samba server on top of it.
Also i installed WSDD on this Linux machine in order for my Samba shares to be found from within Windows.
My Windows 10 Enterprise machine could see the Ubuntu server fine. Just not the samba shares.
This tutorial helped me a lot. After adjusting the group policy, the registry still did not show the AllowInsecureGuestAuth D-word value, so that had to be made manually.
And that was finally the solution. Everything is visible and accessible now.
I can see how lots of people bang their heads against the wall when confronted with these type of problems.
Once again, thank you very much.
Nope. To see the Linux systems I had to install WDDS. There’s ionstructions on how to install WDDS in Debian and Ubuntu forums. Only have 2 windows systems left and their about to become linux machines…
“”AllowInsecureGuestAuth
is the right solution for me and it fixed the problem
Thanks a lot
None of this fixed the problem on my pc’s. IN fact what is even more interesting, I have 3 drives on one pc, all shared. and all giving Everyone full access. But from my other pc, only one of the 3 drives shows up at all and when I try to access it, I am told that I do not have permission.
the key “AllowInsecureGuestAuth” in the registry was the solution for me.
thank you!!!
I have Windows 10 Pro Education on a tablet. Lanman was enabled in group policy, but allowinsecureguestauth was not in the registry. Thank you
Thanks a lot, it worked for me.
Thanks. “Restart your computer” is essential after enabling SMB 1.0/CIFS File Sharing Support, and I missed it at first, because Windows doesn’t prompt the user to restart after making this change. Maybe you should put this in bold text.
I have 2 “new” Win 10 installs on HP Business computers connected to an Asus Router. Every thing works fine if I put my Windows 7 hard drives back in, but with 10 they cant see each other. I have reinstalled, and tried all the tips on Google, but no joy, I waited as long as I could before changing to 10 and I feel it was a waste.
Thank you, after days of frustration these tips finally got my net shares back, using the” Enable LanMan Workstation” procedure worked for me. (had to upgrade from W10 Home to Enterprise to enable the group policy editor)
THANK YOU!!!! After literally weeks of trying EVERYTHING, this has worked
The one about “insecure guest” did the trick for me. Thanks a lot!
None of these worked for me. I can see them but can’t access them.
very thankful for many times searching on internet atlast the problem was solved thanks for this guide.
Yes, Thanks a bunch. Been racking my brain over this one. One day worked next not….Who knows these days
No did not help.
I can see an xp machine but xp cannot see windows 10 machine
this fixed my sons laptop but made my pc worse. He can see all the clients and I can only see my own PC.
Couldn’t be more thankful…. This solved my issue after a long time trying.
After many weeks of searching without a good result, this worked perfectly for me. Thank you for the steps and details!