
Are you wondering how to automatically forward emails in Outlook 365 to another email address? It’s quite useful when you’re going away on a vacation or using a different email address for a certain period of time to stay disconnected from the workplace.
Automatic email forwarding in Outlook app is a convenience that we all can put to good use. The email auto forward in Outlook feature is similar to other email forwarding functionalities that you see on Yahoo Mail, Gmail, Thunderbird, and so on. The idea is to re-send all the emails coming from one email account to another irrespective of the email provider, email app, or email server domain.
Though the process is quite straightforward in online email clients like Gmail, it’s complicated for standalone email client apps that you install on a Windows 11 or macOS computer. Read this article until the end to discover various methods you can use to automatically forward emails on Outlook.
Contents
Reasons to Use Automatic Email Forwarding in Outlook
Before you deep dive into the methods for how to automatically forward emails in Outlook, learn about some scenarios and reasons when email auto forward in Outlook comes in handy:
- You’re going on a vacation and you don’t plan to check your work email during the vacation period. However, you also can’t ignore critical emails to which you must reply. Hence, you can set automatic email forwarding in Outlook to receive super-important emails to an alternative work email or personal email.
- An employee left the organization and you’re yet to appoint someone else in their position. During the vacuum period, you can set up email auto forward in Outlook to transfer incoming emails to another employee’s Outlook account.
- Outlook email auto forwarding feature depends on rules. You can create custom rules to send customer and client queries to a separate Outlook email that the reception or customer service team handles.
- You run a small business and set up many Outlook emails to make the business look professional. But, in the back end, you answer all the incoming email queries. Instead of logging in to all those Outlook emails every day, you can automatically forward emails on Outlook to a specific email. Thus, you only need to check one business email. This approach saves time and effort.
- If you had set up automatic email forwarding in Outlook in one work or personal email of yours, you can keep receiving emails to a backup Outlook email in the event that you forget the password and are unable to reset it.
How to Automatically Forward Emails in Outlook
Find below the separate methods to set up email auto forward in Outlook:
Automatic Email Forwarding in Outlook for Windows
You must use the Rules function of the Outlook desktop app to forward emails to another address automatically. Rules also allow you to create complex conditions like forward emails only if the subject line has a specific phrase, forward when your email is in To rather than CC, and so on. Find below the steps to try:
- Select File > Rules and Alerts.
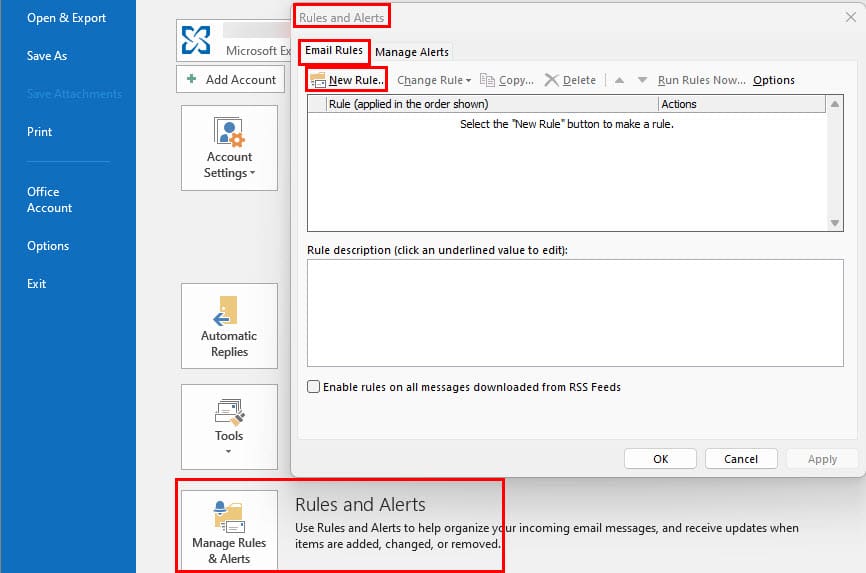
- From the E-mail Rules tab, choose New Rule...
- Under the Start from a template or from a blank rule dialog, you must select a template.
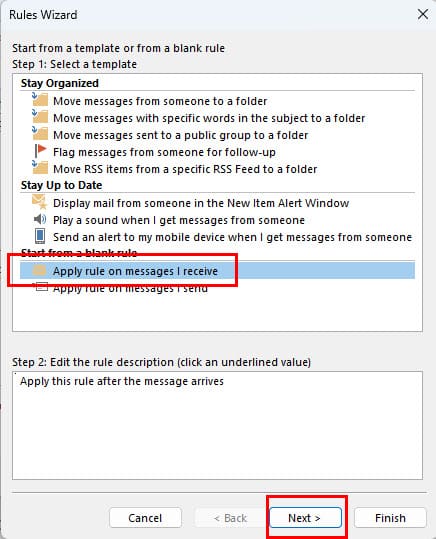
- For instance, you can select Apply rules on messages I receive and click Next.
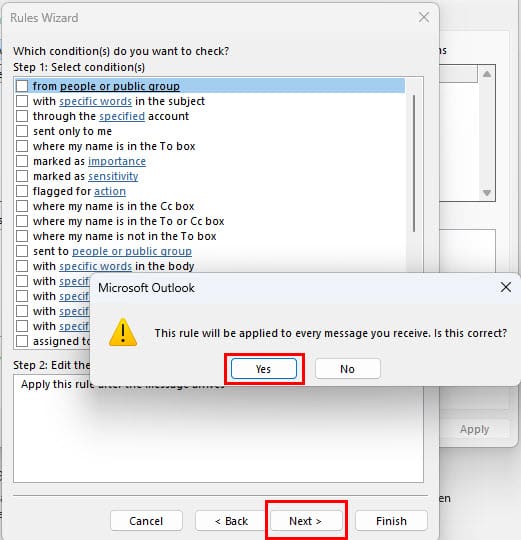
- If you wish to only forward certain messages, you can select conditions for each message that gets forwarded. If you want all your messages to be forwarded, leave everything unchecked. You will get a message that says This rule will be applied to every message you receive. Is this correct? Select Yes.
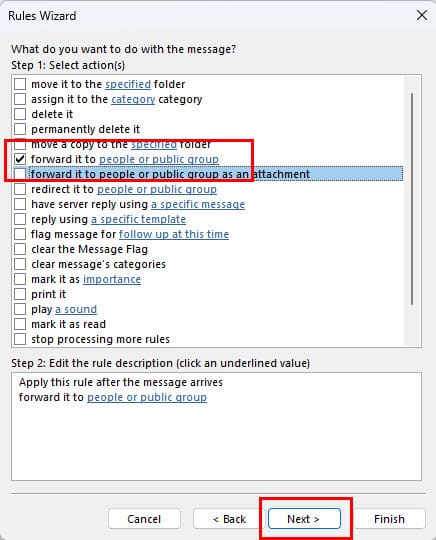
- Check forward it to people or distribution list. This option might say forward it to people or public group on certain versions. In the lower pane, click the people or distribution list or people or public group link.
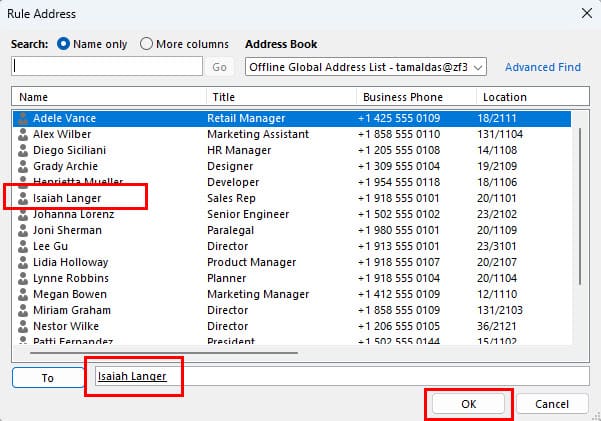
- This will open the Rule Address window with the address book. Search for the email address(es) to which you would like to forward your mail. You can also just type the full email addresses in the To field. Select OK then Next when done.
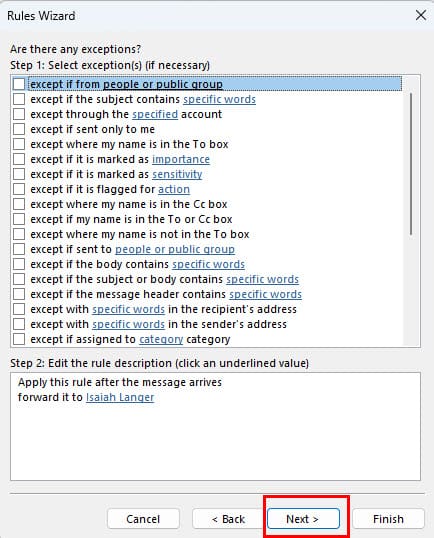
- The box to setup exceptions appears. Select any exceptions you would like to apply to this rule and select Next. Most users leave this blank.
- Under Specify a name for this rule, give your rule a name. Check the box for Turn on this rule if you would like Outlook to start forwarding messages now.
- Check Run this rule now on messages already in Inbox (rarely used) if you would like Outlook to forward everything that is already in your Inbox.
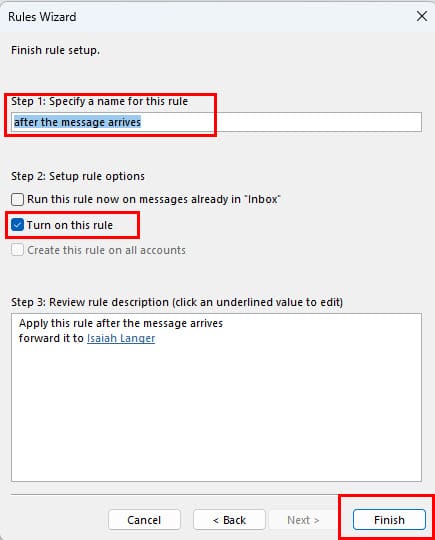
- Click Finish and you’re done.
Note: If you’re not using Outlook while connected to a Microsoft Exchange Server, Office 365 environment, or connected to an Outlook.com account, you’ll need to leave Outlook running on a computer in order for forwarding to work.
Automatic Email Forwarding in Outlook for macOS
The new Microsoft Outlook app for MacBook and iMac comes with some exciting features. One of these cool features is email auto forward in Outlook for Mac app. If you’re on a macOS computer and would like to learn how to automatically forward emails in Outlook, try the steps mentioned here:
Accessing Outlook Rules
On the Outlook for Mac app, you must use Rules to create an email forwarding automation. Like Outlook Web and Outlook on the web, there is no easy way to set up automatic email forwarding in Outlook. Before you can create Rules for email forwarding, you must know how to call the Rules command. Here are the steps you can try:
- Open the Outlook app on your MacBook or iMac and click the Outlook menu on the Mac toolbar.
- From there, click Preferences to find Rules under the Email commands section.
- Alternatively, click the Outlook app on your Mac and then select Tools on the Mac toolbar.
- The context menu that shows up, gives you the option to access Rules.
- If you frequently use automation on the Outlook app and want to access the Rules commands easily, you can add it to the Outlook Toolbar.
- Click the ellipses icon on the Outlook Toolbar and then select Customize Toolbar.
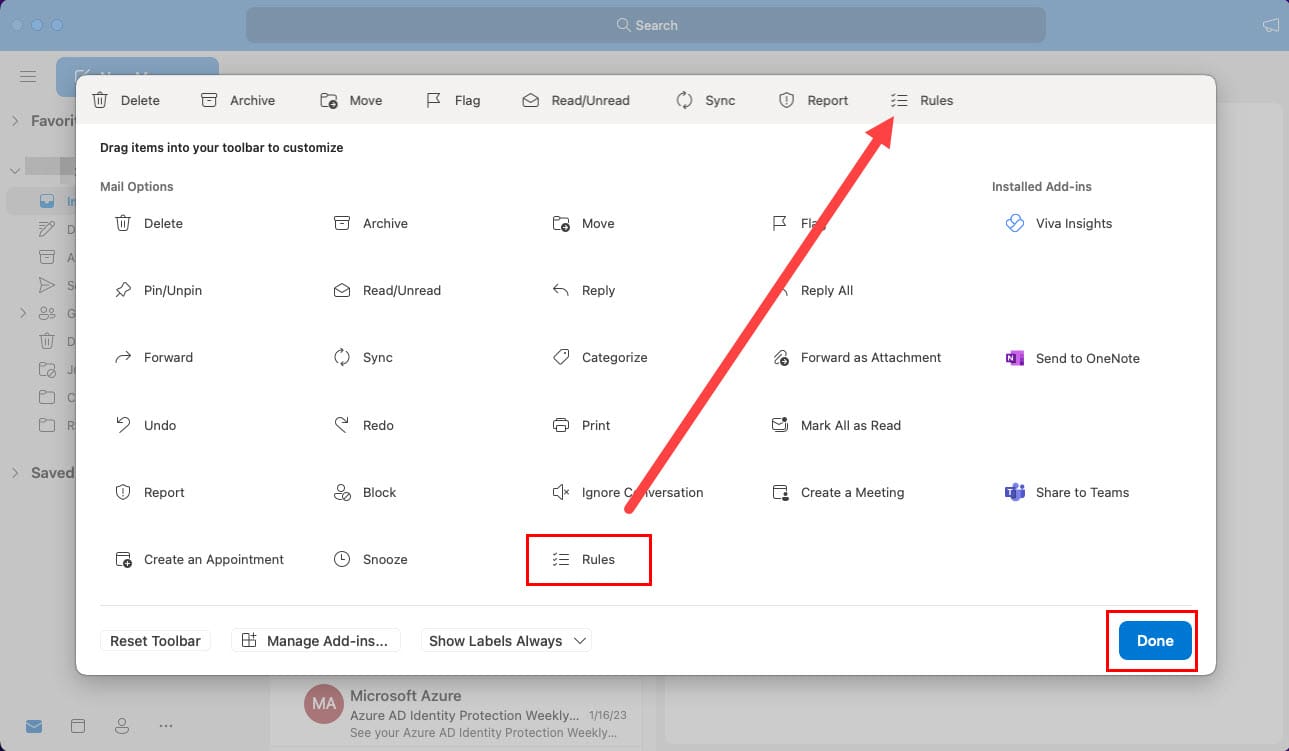
- Now, drag the Rules commands menu to the Toolbar and click Done.
Now that you know how to access Rules, you’re ready to try the next steps to create an email forwarding automation in Outlook.
Creating Email Forwarding Rules
- Open Outlook and click the Rules button on the Outlook Toolbar.
- Then, select Edit Rules.
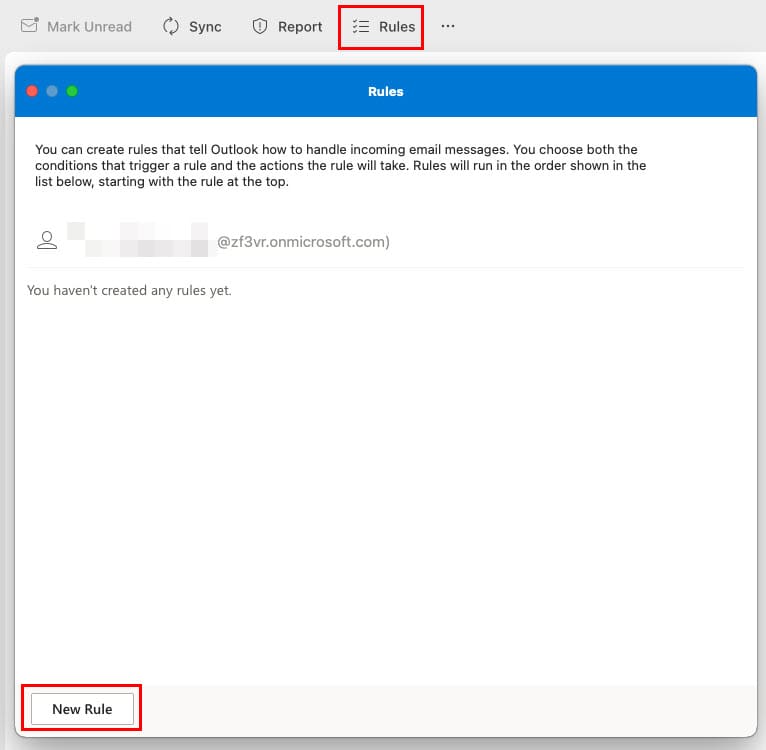
- Now, you should see the Rules workspace. Here, you can create various automation for the Outlook app.
- Click on New Rule.
- First, you must give the rule a name. You can name it Automatic Email Forwarding.
- Now, you must set one or many conditions for this rule. Depending on the conditions, Outlook will execute the actions.
- For example Subject includes is one condition you can use to forward all emails that have the Technical Support phrase in the subject line.
- Now, it’s time to select an action for the above condition. For email forwarding, the action would be Forward to.
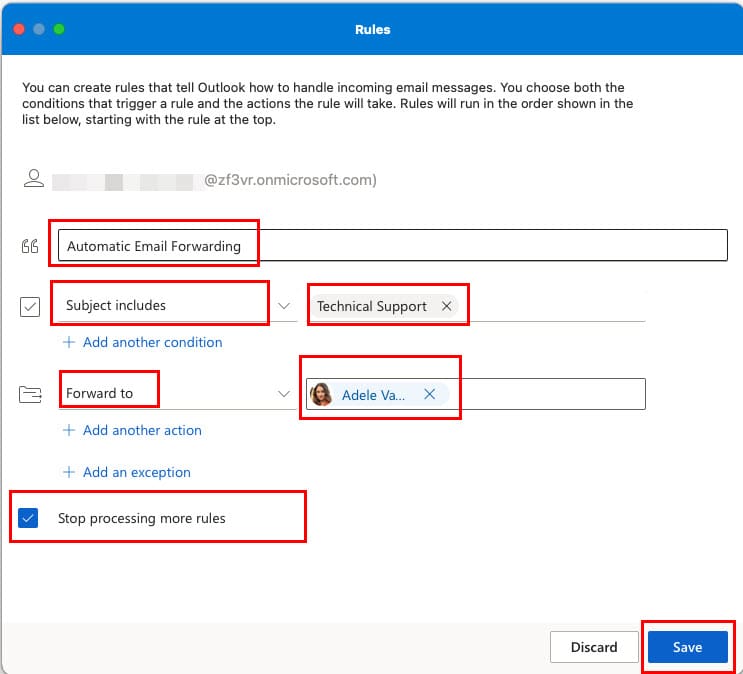
- In the right side box, type in the email address where you want to forward emails.
- Here, you can use the Add another action or Add an exception to further customize the automation.
- Now, just click Save to apply the rule.
Automatic Email Forwarding in Outlook for iOS and Android Devices
At the time of writing, the feature automatically forward emails on Outlook isn’t available on the Android app or the iOS app. You need to sign in to Outlook on the web or Outlook Web App using a mobile web browser like Chrome on Android and Safari on iOS. Once logged in, follow the steps mentioned in the below section to activate email forwarding.
Automatic Email Forwarding in Outlook Web (Bonus Method)
If you’re using the web version of the Outlook app either for personal (Outlook on the web) or business use (Outlook Web App), you can effortlessly set up email forwarding by following these steps. Thankfully, Microsoft made Outlook email forwarding available for both the Outlook.Office.Com and Outlook.Live.Com domains.
- Log in to Outlook work email or Outlook personal email on the web.
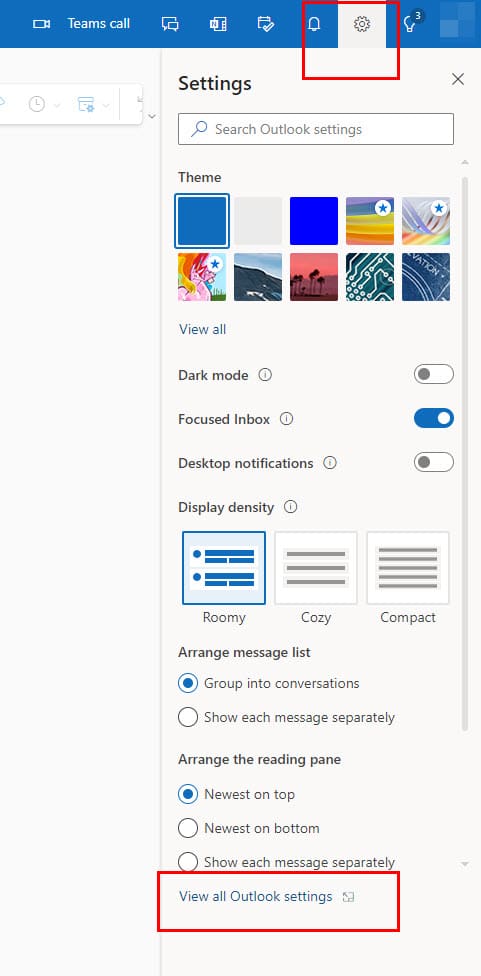
- From the Outlook web home screen, click the Settings button on the top-right corner of the app and to the left of your avatar or account initials.
- In the sidebar that opens, click the View all Outlook settings link located at the bottom.
- Click Mail on the left side panel and then select Forwarding.
- Checkmark the checkbox beside Enable forwarding dialog.
- The Forward my email to: field will become active.

- Type in the full email address where you want Outlook to forward all your emails.
- If you want to keep the forwarded email also in the original Outlook inbox, checkmark the box for the Keep a copy of forwarded messages option.
- Click Save to implement automatic email forwarding in Outlook.
Email Auto Forward in Outlook: FAQs
I do not have any Rules set, but my email is still forwarding to another address. How do I stop this?
If you are in a corporate environment, your email administrator may have set forwarding on the server end. Contact your IT department to see if they can help you disable the email forwarding feature on your Outlook account or profile.
How do you auto forward to multiple emails?
You can auto forward emails to multiple emails by creating a Forward it to people rule on the Outlook app and then selecting multiple recipients in the Rule Address dialog box. If you already created a Distribution List in your Outlook email profile, then you can simply set the Distribution List as the recipient for the forwarded emails. All the contacts within the Outlook Distribution list will receive the emails in your absence.
Conclusion
As of now, these are some of the methods you can try if you’re wondering how to automatically forward emails in Outlook. The methods that you can use will depend on your Outlook app edition, Outlook email account type, Outlook email provider (personal or work), and the exact scenario for email forwarding. One of the best things about automatic email forwarding in Outlook is you can create complex and custom rules for email forwarding if you possess IT tech skills.
Give the above methods a try and comment below on how did pan out. Next up, Outlook Email view changed: the best ways to fix it and how to recall email messages in Outlook 365.


I use this rule and find it helpful when forwarding emails from selected senders to my phone. The rest stay in the Inbox on my allways=0n PC with MSO 2019, and I process them when I get back to the PC. I use Outlook 2019 on a Windows 10 PC.
The only fault I find is that when the rule automatically forwards a message, it marks it as ‘Read’ on my PC. I would like to keep the message on the PC ‘Unread’ so that I don’t overlook something I’ve put it off until I’m back in the office.
Is there a way to keep the forwarded messages ‘Unread’ even though they’ve been forwarded? I’ve tried to run a VBA script ===Sub DontMarkRead(Item As Outlook.MailItem)
Item.UnRead = True
Item.Save
End Sub===
that will mark the forward message ‘Unread’ on my PC, but often I get “An Unexpected Error Occurred” message and the the rule fails.
I’m hoping there is a better, more reliable, method.
Thanks.
So I am stuck at step one. I have outlook 2016 and there is no “info” under ‘File.’ I have a stand-alone version of Office 2016. Can you please advise?
Thanks in advance.
I have set rules to auto forward mails to specific user ID once received to my mailbox, however when i run the rule it shows mails sent in my sent items but the intended recipient( to whom mails are forwarded) is not receiving them, what could be the issue how to resolve this please help urgently
I have wanted to implement this for quite a while and seeing as we are in Self-Isolation in Australia, I thought: Let’s do this!
My Outlook looks slightly different. It is Office 365. However, I was able to adapt to the instructions.
It is so helpful.
Thanks for publishing this article.
This is not even close to what my Outlook program looks like.
Works great. Thanks!
I have set this up and the email will forward to the intended people twice. Any idea why?
Not working if using an external email as the forward address
When you turn this function on do you still get a copy of the email in your email inbox as well? Or once it is forwarded is it no longer in your inbox?
Outlook is driving me crazy. It flatly refuses to forward emails from an employee on vacation to her substitute. A window pops up that says the rule failed. Doesn’t say why. Then it turns the rule off.
It’s a very simple rule: Forward any email that comes in to the substitute (and I selected her address from the contacts list and it is valid).
I have this same problem every single year when this particular employee goes on vacation. Grrr!
Work perfectly :)
how and when do you put the forwarding address in? I am trying to forward all emails for a former employee
The auto forward is working, the only problem I am having is that the auto-forwarded email does not include the actual email address of the sender. It comes over as “John Holt” versus “johnh@cityofclovis.com”.
Is there an option to include?
Thanks,
John
On imac, I cannot find the home tab to set up auto forwarding