The Steam Deck has revolutionized portable gaming, providing gamers with the ability to enjoy their favorite titles on the go. While this handheld device offers a fantastic out-of-the-box experience, it’s essential to keep it updated to ensure optimal performance and access to the latest features. In this tutorial, we’ll delve into why updating your Steam Deck is crucial and walk you through the step-by-step process.
Contents
How to Update Steam Deck
Like any software or hardware device, the Steam Deck may have occasional bugs or stability issues. Regular updates address these problems, ironing out performance-related concerns, optimizing battery life, and ensuring a smoother gaming experience. Staying up to date with firmware and system updates will provide you with the latest bug fixes and stability improvements. With that in mind, here’s how you can update the Steam Deck:
- Make sure your Steam Deck is connected to the internet.
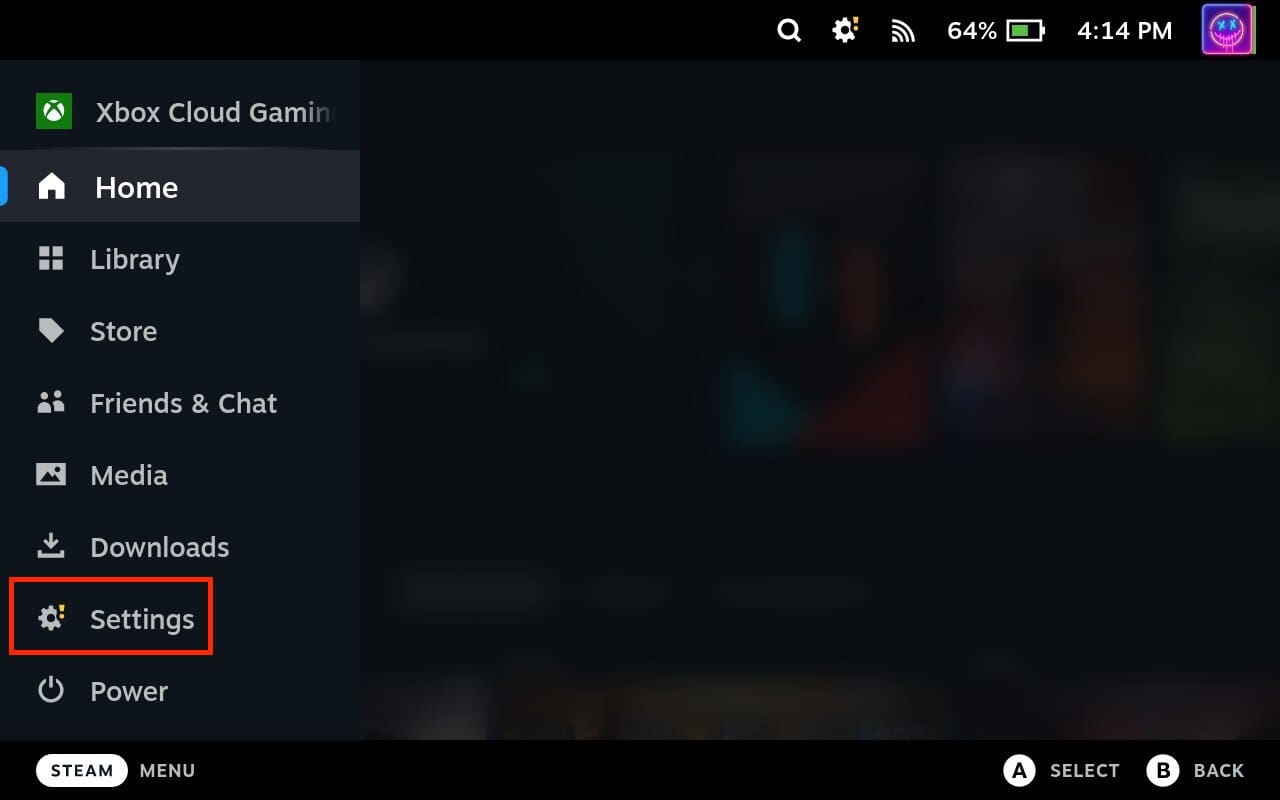
- Press the Steam button on the Steam Deck.
- Select Settings from the menu.

- Select System from the left-hand menu.
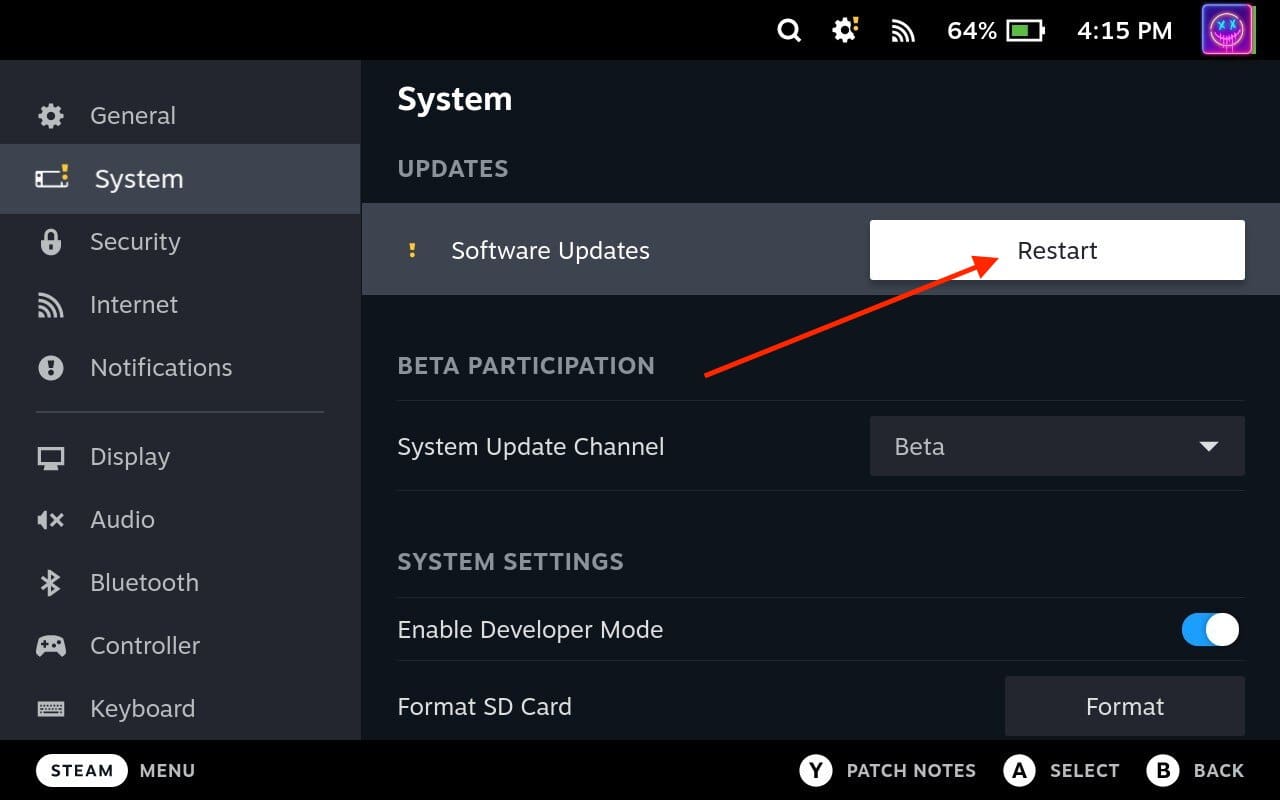
- Select Check for Updates.
- If there are any updates available, select Apply.
- Your Steam Deck will now download and install the updates.
- Once the updates are installed, your Steam Deck will restart.

Once it restarts, navigate back to the Settings menu and verify that the system is up to date. If there are no further updates available, you’re good to go! Valve releases updates regularly, and by regularly checking for and installing updates, you can stay ahead of any potential issues and enjoy the latest features.
How to Switch To A Different System Update Channel
The Steam Deck offers different system update channels, allowing users to choose between stable and beta releases. Switching to a different system update channel gives you the opportunity to access new features and enhancements ahead of the stable release. In this tutorial, we will guide you through the process of switching to a different system update channel on your Steam Deck. There are three different System Update Channels to choose from:
- Stable: Recommended experience for most users.
- Beta: Testing for new Steam features. Updates frequently.
- Preview: Testing for new Steam and system-level features. Updates frequently. You may encounter issues.
As you might suspect, your Steam Deck is running the Stable Channel out of the box, but we’ll walk you through the steps to switch over to a different System Update Channel:
- Make sure your Steam Deck is connected to the internet.
- Press the Steam button on the Steam Deck.
- Select Settings from the menu.
- Select System from the left-hand menu.
- Scroll down until you reach the Beta Participation section.
- Highlight and select the drop-down box next to System Update Channel.
- Select one of the following:
- Stable
- Beta
- Preview


The Steam Deck will now download and install the necessary updates related to the new update channel. This process may take a few minutes, depending on the size of the update and your internet connection speed. Ensure that your Steam Deck remains powered on and connected to the internet during this process.
How to Update Steam Deck Games
Keeping your games updated is essential to ensure optimal performance, bug fixes, and access to the latest features. In this tutorial, we will walk you through the process of updating games on your Steam Deck, ensuring you stay up to date with the latest enhancements and improvements.
- Make sure your Steam Deck is connected to the internet.
- Press the Steam button on the Steam Deck.
- From the sidebar, highlight and select Library.
- Navigate to the game that you want to update and select it.
- If there’s an update available, click the Update button.
- Wait for the update to be installed.


The duration of the download will depend on the size of the update and your internet connection speed. Once the download is complete, the installation process will begin automatically. From there, you can start playing the game simply by selecting it from your library or right from the main launcher.
How to Update Steam Deck Apps
Updating your apps on the Steam Deck is a straightforward process that helps you take advantage of bug fixes, performance enhancements, and new features. By following the step-by-step guide provided, you can easily keep your apps up to date and ensure an enjoyable and seamless gaming experience on your Steam Deck. But unlike updating Steam Deck games, you’ll first need to switch over to Desktop Mode in order to update apps.
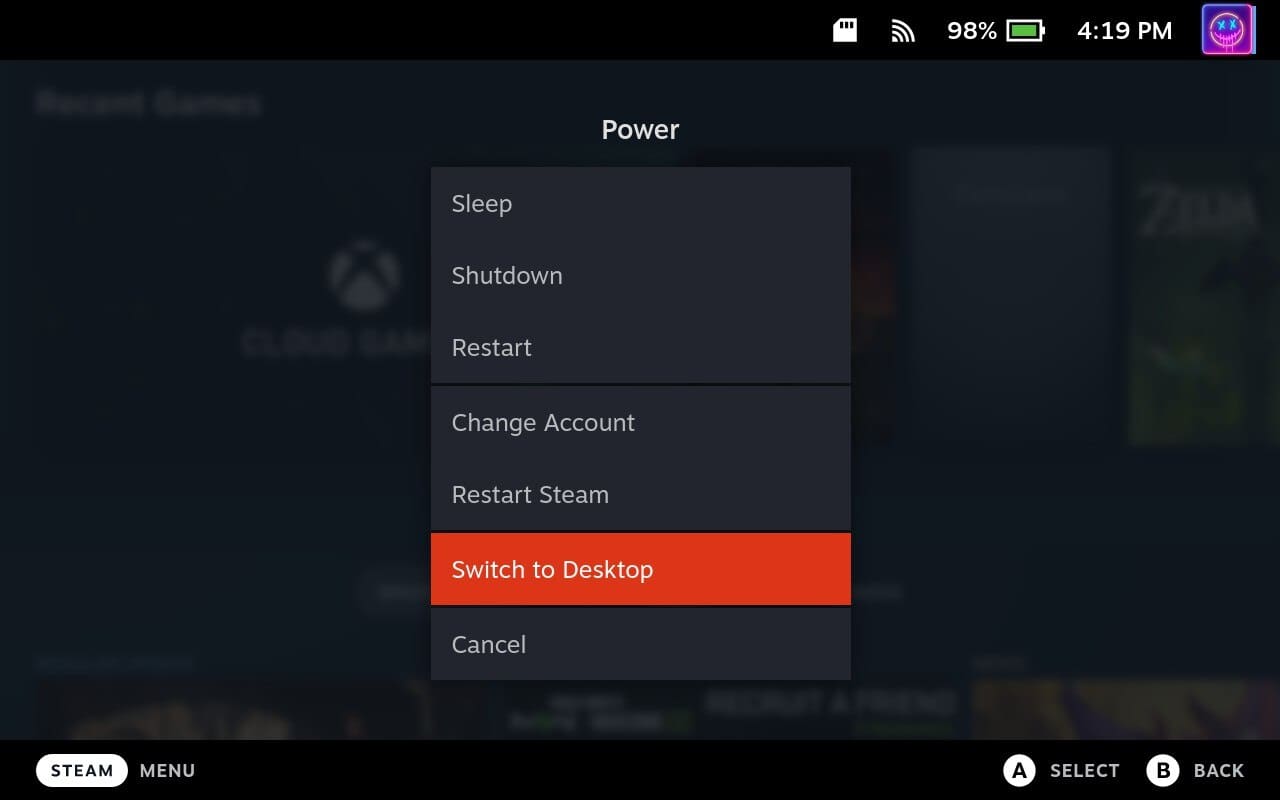
- Press the Steam button on your Steam Deck.
- Scroll down and select Power.
- From the Power Menu, highlight and select Switch to Desktop.
- Wait until your Steam Deck switches to Desktop Mode.
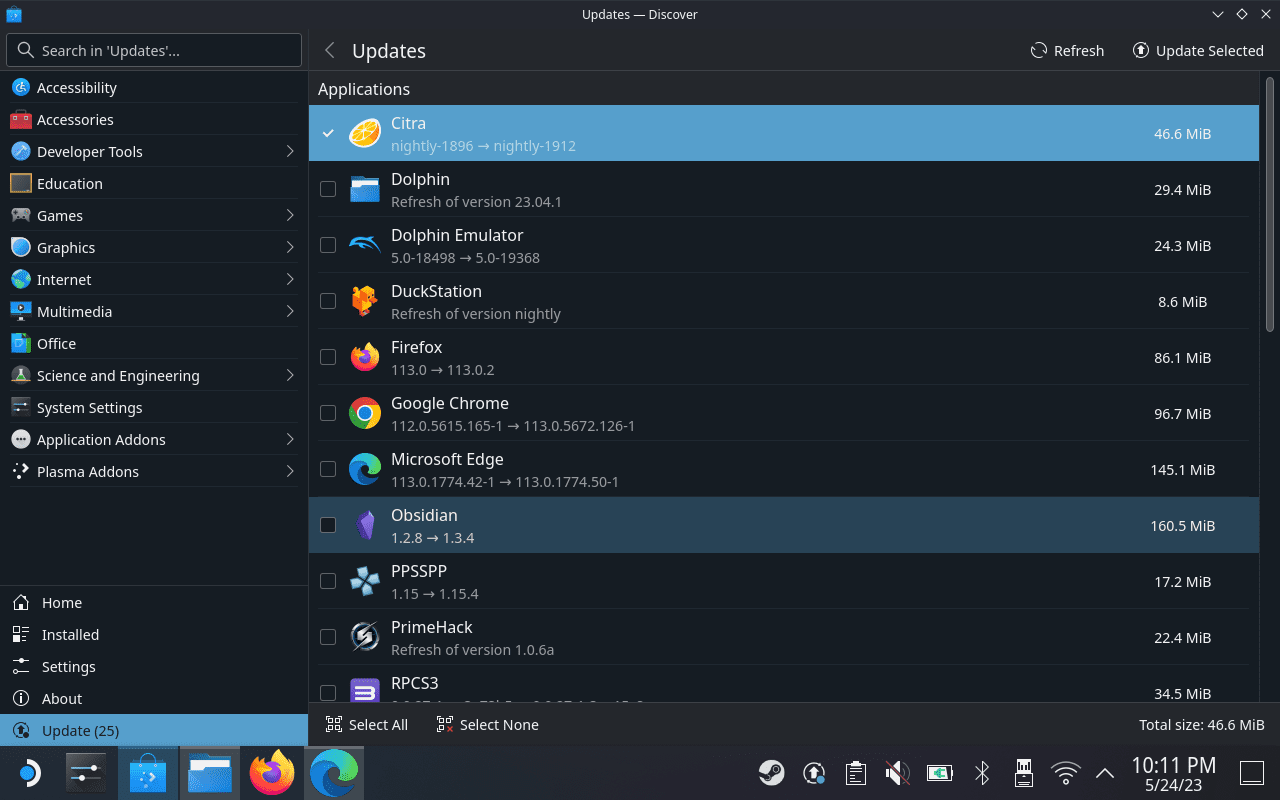
- Once in Desktop Mode, click the Discover (app store) icon in the bottom left corner of the taskbar.
- Scroll to the bottom of the sidebar.
- Click Update.
- From the Updates page, click the Refresh button in the top menu bar.
- If there are any applications that need to be updated, click the Update All button in the top right corner.


There might be instances where you need to update apps multiple times just to make sure that you are running the latest version. Simply repeat the steps above until there are no more updates left to install. Once the installation process is finished, verify that the app has been successfully updated.
Reset Steam Deck Using Recovery
Unfortunately, you might run into a situation where a game, app, or system update has caused the entire Steam Deck to stop functioning properly. In the event that this happens to your Steam Deck, then you’ll need to reset the device using Valve’s Recovery option.
This method is a bit different from what you might expect, as you are actually installing the SteamOS recovery image onto a USB drive. This method is preferred for those who want to reinstall SteamOS without losing all of their games, saved data, and other files. However, in the event that you are still running into issues, you can also use the recovery image to reset Steam Deck to factory settings.
- Download the SteamOS Recovery Image to your computer.
- Plug the USB drive into your computer.
- Open the appropriate Utility software based on your computer’s operating system.
- For Windows, Valve recommends using Rufus.
- For Mac and/or Linux, Valve recommends Balena Etcher.
- Follow the on-screen steps to select the SteamOS recovery file and write it to the USB drive.
- Once the process is complete, eject the drive from your computer.
- Connect a USB hub to your Steam Deck.
- Plug in the newly-created recovery drive.
- Shut down your Steam Deck completely.
- Hold the Volume Down button.
- Press and release the Power button.
- When you hear a chime, release the Volume Down button.
- From the Boot Manager, select the EFI USB Device.
- Wait until you are booted into the Desktop environment.
- Once in the Recovery Desktop Mode, double-tap or double-click one of the following:
- Re-image Steam Deck
- This performs a full factory reset – all user info, installed games, applications, or operating systems will be wiped and replaced with stock SteamOS.
- Clear local user data
- This reformats the home partitions on your Steam Deck, which will remove downloaded games and all personal content stored on this Deck, including system configuration.
- Re-image Steam Deck
- Follow the on-screen steps to reset Steam Deck.
After the reset is complete, your Steam Deck will be restored to its factory settings and you can set it up again as if it were new. Keep in mind that you will need to sign in to your Steam account and re-download any games or apps you had previously installed. It’s also a good idea to back up any important data before performing a system recovery to avoid losing anything important.
Conclusion
Updating your Steam Deck is vital for maintaining its performance, stability, and security. By following the simple steps outlined in this guide, you can keep your device up to date, benefit from bug fixes and new features, and ensure a seamless gaming experience. Stay connected, keep your Steam Deck updated, and unlock the full potential of portable gaming!