

Microsoft releases two major OS updates every year. These updates bring new features to the table, as well as many other improvements — that’s why they’re called feature updates.
The Redmond giant usually rolls out the first major update in April or May, while the second one lands in October or November.
Many users prefer to postpone installing these OS updates for a few weeks or even months. The reason behind this decision is a simple one: major Windows 10 updates sometimes bring severe bugs and code glitches of their own that may break users’ computers.
If you don’t want to risk bricking your computer after installing the latest Windows 10 OS version, you may want to postpone installing feature updates. And in this guide, we’ll show you exactly how you can do that.
Contents
How to Block Windows 10 Updates
Windows 10 Pro, Windows 10 Enterprise, Windows 10 Education, and Windows 10 S users have more options at their disposal when it comes to deferring feature updates.
However, if your computer is directly managed by an organization, you won’t be able to edit the update settings.
Windows 10 Home users don’t have too many straightforward options available to stop major updates, but we’ll list a few workarounds for this category of users as well.
Method 1 – Pause updates
Pause updates for 7 days
The first option is to simply pause the updates for seven days. In this manner, you’ll have plenty of time to check the forums and see if the latest OS version is stable enough for you.
To stop Windows 10 updates for seven days, go to Settings →Update & Security → Windows Update and click on the button that says Pause updates for 7 days.

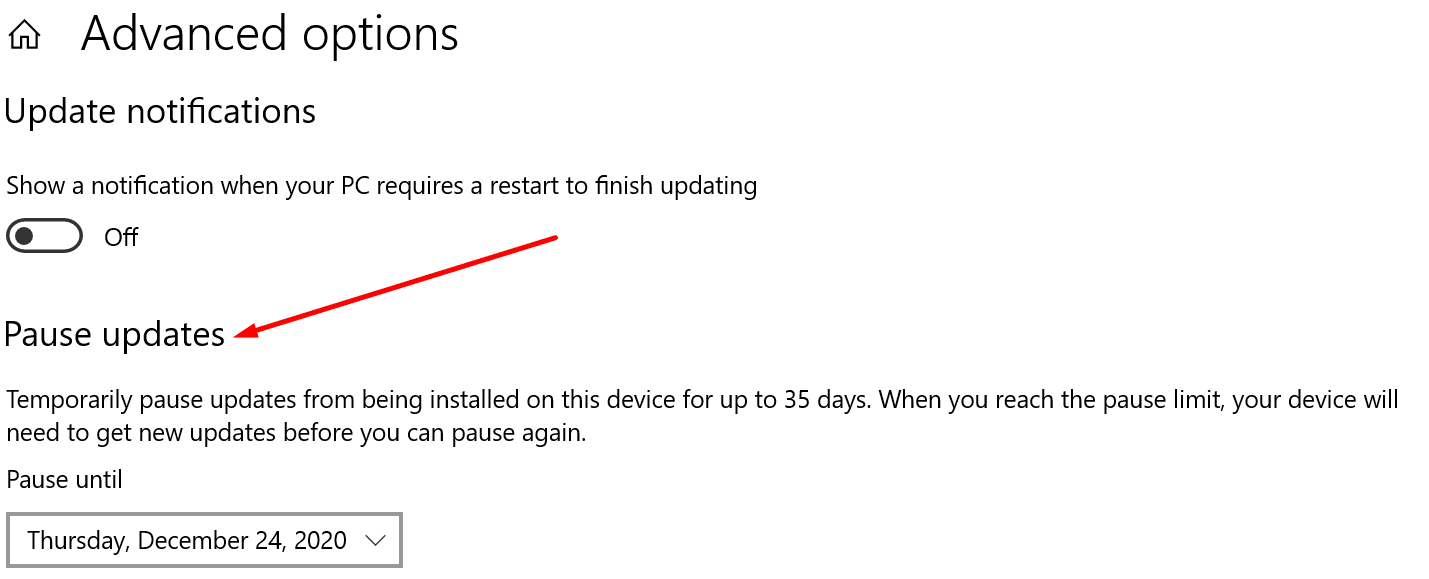
Pause updates for 35 days
- Click on the Start button and go to Settings
- Select Update & Security
- Click on Windows Update
- Scroll down to Advanced options

- Go to Choose when updates are installed or Pause updates (depending on your OS version)

- Select the number of days you want to block the feature update for.

Important Notes:
Starting with Windows 10 version 2004, Windows 10 Pro users can no longer defer updates for 365 days. Microsoft decided to remove this option in an attempt to convince users to upgrade to the latest OS version shortly after release.
In other words, users running version 2004 and newer, no longer have the Choose when updates are installed option under Advanced update settings.
Method 2 – Use the Group Policy settings
Next on the list is the Group Policy method. Note that this option is not available on Windows 10 Home.
Here are the steps to follow:
- Launch a new Run window by pressing the Windows and R keys on your keyboard
- Type gpedit.msc and hit Enter
- Navigate to Computer Configuration → Administrative Templates → Windows Components → Windows Update → Windows Update for Business
- Locate the following two options: Select When Preview Builds and Feature Updates Are Received, and Select When Quality Updates Are Received

- Double-click on the first option, make sure it’s enabled, and then change the number of days in the Options box
- Next, do the same for the quality update option.

Method 3 – Use the Registry Editor
If you’re running Windows 10 Home, you can tweak the Registry to prevent OS updates from installing.
We strongly suggest that you backup your data before editing the Registry. If you’re not feeling comfortable editing the Registry, use the other methods we listed in this guide.
With the help of this method, you’re going to create a new Registry entry that will prevent Windows Update from automatically installing monthly updates.
Meanwhile, if you happen to change your mind, you’ll still be able to manually download and install the latest updates.
- Launch a new Run window by pressing the Windows and R keys
- Type regedit and press Enter
- Go to HKEY_LOCAL_MACHINE\SOFTWARE\Policies\Microsoft\Windows
- Right-click on the Windows folder
- Select New → Key

- Name the newly-created key WindowsUpdate
- Then, right-click on the WindowsUpdate key you just created and select New → Key again

- Create a new key and name it AU
- Repeat the process, right-click on the AU key
- This time, select New → DWORD (32-bit)
- Name the new DWORD key NoAutoUpdate

- Double-click on the NoAutoUpdate key
- Edit its value from 0 to 1 and save the changes

- Restart your computer.


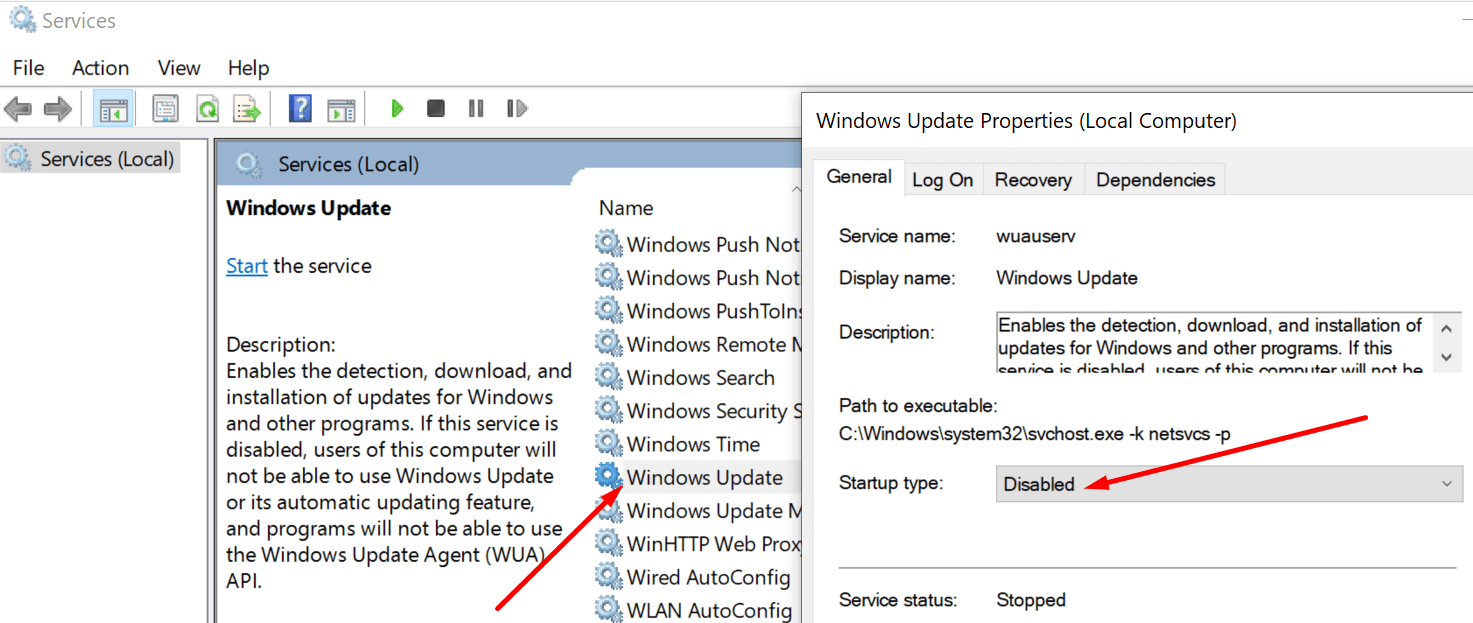
Method 4 – Disable the Windows Update service
The Windows Update service is a key OS component that controls when your computer searches for updates and installs any pending updates. You can disable the service in an attempt to temporarily delay major OS updates.
- Press the Windows and R keys to open a new Run window
- Type services.msc and press the Enter key
- Locate the Windows Update service
- Go to the General tab and select Startup Type
- Set the startup up to Disabled to turn off the update service

- Restart your computer for the changes to take effect.
Method 5 – Set up a metered connection
Another workaround that you can use is to set up a metered connection if you’re using a wireless connection. In other words, you’ll limit the amount of bandwidth that your computer can use to download updates.
- Go to Settings
- Click on Network & Internet
- Select Wi-Fi
- Go to Manage known networks
- Select your network
- Scroll down to Metered connection

- Toggle on the Set as a metered connection option.

You Can’t Postpone Windows 10 Updates Indefinitely
These methods allow you to delay or postpone major Windows 10 updates for up to 35 days if you’re running Windows 10 version 2004 and newer, or up to 365 days if you’re running older OS versions.
After 35 days or 365 days, respectively, you’ve got no other choice but to install the latest OS version available on that date.
The latest OS updates also bring enhanced security features to the table. By limiting the options that users have to delay or block these updates from installing, Microsoft makes sure that sooner or later you’ll be running the latest OS version on your device.
In this manner, your computer will get an extra security layer against the latest threats and potential zero-day exploits.
Over to you now: Do you usually install the latest Windows 10 updates as soon as they’re out? Or do you prefer to delay installing them and buy Microsoft more time to roll out a hotfix in case the updates bring major issues of their own?
Let us know in the comments below!

FYI, you’re assuming most people know what you’re talking about. But you missed a step/clarifiers in #4 (think like a grandma, not a techie-K.I.S.S.):
Method 4 – Disable the Windows Update service
Press the Windows and R keys to open a new Run window
Type services.msc and press the Enter key
Locate the Windows Update *NOT* Windows Update MEDIC SERVICE
–> RIGHT CLICK WINDOWS UPDATE AND GO TO PROPERTIES <–
Go to the General tab and select Startup Type (center of pop up screen)
Set the startup up to Disabled to turn off the update service
GREAT TIPS, THANKS! Wish I'd known these earlier. I'm now stuck with Windows 11. :-(